# Hideez Key 4 – User Manual
Use cases and guidelines for using Hideez Key 4
### What is Hideez Key 4?
Hideez Key 4 is a FIDO2 security key, Bluetooth password manager, and MFA key fob. The Key provides passwordless access to accounts and workstations, proximity-based PC login and logout, as well as password & OTP autofill.
It's much more than just a Windows security key or FIDO2 password manager – it's a versatile device that gives you total control over your online security.\
\
Hideez Key 4 is suitable for both personal and enterprise use within the scope of the [Hideez Authentication Service](https://hideez.com/pages/hideez-authentication-service), a cloud-based passwordless IAM solution for organizations.
### Main features of Hideez Key 4
* [**FIDO2 Key For Passwordless Sign-In**](/passwordless-sign-in-and-2fa/setting-up-passwordless-logins-and-2fa)
Experience phishing-resistant passwordless logins and two-factor authentication across your accounts. Hideez Key is supported by Google, Facebook, Microsoft, Dropbox, Twitter, and hundreds of other [**FIDO-enabled web services**](https://hideez.com/pages/supported-services). Supported by Microsoft and Google accounts.
***Note:** Compatible with Windows, macOS, iOS, Android*
* #### [Password Manager and OTP generator for web services and applications ](/guide-for-hideez-key/account-management/adding-accounts-for-websites-and-apps.-generating-otps)
Use Hideez Key as a password manager to store your credentials and enter them automatically at the push of the button or by hot keys. Store up to 1,000 logins and passwords, and generate new strong passwords or OTP-s with ease.
***Note:** Proximity works only on Windows computers.*
* [**Desktop Login And Logout Based On User Proximity**](/guide-for-hideez-key/vault-settings/pc-locking-unlocking-methods-proximity-settings)
The Proximity login and logout feature automatically disables access to your PC when you walk away and the strength of the Bluetooth signal is falling down. Use the Hideez Key to lock and unlock your desktop in seconds. Supports Personal, Domain AD, Azure Ad, and Microsoft types of accounts.
***Note:** Proximity works only on Windows computers.*
* #### [Rechargeable Battery And Extended Connectivity](/guide-for-hideez-key/service-operations/battery-maintenance)
Hideez Key 4 has a rechargeable battery and combines the benefits of password-based and passwordless authentication with support for **Bluetooth, NFC**, and **micro USB** connection. Use it as an FIDO2 password manager or MFA key fob to securely access your devices and accounts.
* #### [Universal RFID Key card For Physical Access](/physical-access/use-hideez-key-as-an-rfid-card)
Open RFID electronic doors with the Hideez Key. Use your key as an RFID password manager to securely access your physical spaces. All you need is an RFID programmer, and you're good to go. One key can store only one RFID code.
* [**Universal Identity and Access Management Concepts Tool For Organizations**](https://enterprise.hideez.com/hideez-key-enterprise-edition/hideez-key-enterprise-edition)
Hideez Key 4 is part of the [**Hideez Authentication Service**](https://hideez.com/pages/hideez-authentication-service) that will help you manage accounts and access privileges of your workers 100% remotely and securely. Employees can use Hideez Keys as their primary or secondary authentication method in addition to biometric passkeys and a mobile authenticator.
{% hint style="info" %}
The Ukrainian version of this manual can be found [**here.**](https://key4-ua.hideez.com/)
{% endhint %}
# Quickstart Guide
Hideez Key — Quick start Guide for Windows 10/11
{% hint style="info" %}
**IMPORTANT**: Please note that the Hideez Key 4 is only supported by Windows 10 or 11 (Start with ver. 1903 (2019) and later operating systems).
{% endhint %}
{% hint style="warning" %}
**Please note!** The password manager, password generator, and smart lock functionality only work on **Windows 10** or **Windows 11** computers with the Hideez Client app installed.
{% endhint %}
### Step 1: Remove the insulating material from the case of the device
Open up the[ Hideez Key's case](/guide-for-hideez-key/service-operations/battery-maintenance) and remove the white plastic stripe.
### Step 2: Install the Hideez Client application
You can download the latest version of the Hideez Client [here](https://update.hideez.com/update/hideezclient/clientsetup.exe).
Run the **clientsetup.exe** file, select the **Standalone version,** and check the **Use Windows 10 internal Bluetooth** box. In addition, you can select the desired language.
If you selected the wrong options during installation, you can change them later in the ["Configuration" utility](/guide-for-hideez-key/configuration-app).
### **Step 3: Pair the Hideez Key with your Windows PC**
After launching the application for the first time, you will need to pair the Hideez Key with your Windows PC.
1. Open **Windows Settings** → **Devices** → **Bluetooth & other devices** -> **Add Bluetooth or other device** -> **Bluetooth**
2. Press the button on the Hideez Key to activate the device. The button will flash blue and you will see the key in the list of available Bluetooth devices. The last five digits should coincide with the serial number (SN) printed on the device box (e.g. HK-00203).
3. As soon as you establish a connection, the button will flash green. Confirm pairing by pressing the button once again. A new device HK4-00203 will appear in the Bluetooth & other devices section.
{% embed url="" %}
###
{% hint style="warning" %}
If your Windows 11 computer does not detect the Hideez key in the list of devices, please refer to this troubleshooting guide:
* [**Windows 11 can not recognize the Hideez Key in the device lists**](/support/troubleshooting#windows-11-can-not-recognize-the-hideez-key-in-the-device-lists)
{% endhint %}
### Step 4: Update the firmware of your device
{% hint style="info" %}
**Please note that this step is mandatory. Otherwise, your Hideez Key may become unreliable and not support new features.**
{% endhint %}
Once the Hideez Key is paired with your PC and authorized in the Hideez Client, you will be able to update the device firmware to the latest available version. Open the **Firmware update app** and follow the on-screen instructions.
{% hint style="info" %}
Please see our full guide on how to update the firmware on your Hideez Key.
* [**Firmware update through utility**](/guide-for-hideez-key/service-operations/firmware-update-through-utility)
* [**Firmware update through Web**](/guide-for-hideez-key/service-operations/firmware-update-through-web)
{% endhint %}
Check the “**Windows Bluetooth**” option and click on the “**Quick update**” button. Keep the device close to the computer and wait until the firmware is fully updated.
{% embed url="" %}
### Step 5: Set up your Master password in the Hideez Client
Once you open the Hideez Client, it will recognize the connected device and prompt you to create a **master password**. The password must be longer than 8 characters (letters, numbers, and special symbols). You can change your master password later on, but be sure to remember it.
{% hint style="danger" %}
**Please note!** It will be impossible to recover a forgotten master password! If you don't have a master password, you can only [wipe all the data which is stored in your Key](/guide-for-hideez-key/service-operations/wiping-the-device).
{% endhint %}
### Step 6: Update the firmware of your device
Once the Hideez Key is paired with your PC and authorized in the Hideez Client, you will be able to update the device firmware to the latest available version. Open the **Firmware update app** and follow the on-screen instructions.
Check the "**Windows Bluetooth"** option and click on the "**Quick update"** button. Keep the device close to the computer and wait until the firmware is fully updated.
{% embed url="" %}
### Step 7: Access the Password manager
After updating the firmware, click the "**Load password manager**" button in the upper left corner to access the **Password Manager.** You will be required to enter the master password you created during the initial setup.
### Step 8: Manage your passwords and 2FA
Go to the **Password Manager** tab and click the "+" icon to add a new account.
You can also use the keyboard shortcut **Ctrl + Alt + A** to open a popup window and add your account information directly from any website. In this case, the account name and app/site fields will be pre-populated and can be edited manually.
When adding new accounts, you can change the account name, website address, generate a new password, and enable one-time password generation for those sites where you have 2FA enabled.
You can also [import ](/guide-for-hideez-key/vault-settings/backups-data-export-and-import#importing-your-data-to-the-hideez-client)or [export ](/guide-for-hideez-key/vault-settings/backups-data-export-and-import#backups-and-exporting-your-data-from-the-hideez-client)your credentials in CSV format.
{% hint style="info" %}
**Once you have added multiple accounts, you will be able to use two login methods:**\
\
**1) Pressing the button on the Hideez Key**\
a) 2 clicks = login autofill\
b) 3 clicks = password autofill\
c) 4 clicks = OTP autofill
**2) Using keyboard shortcuts**\
a) Ctrl+Alt+L = login autofill\
b) Ctrl+Alt+P = password autofill\
c) Crtl+Alt+O = OTP autofill
{% endhint %}
{% embed url="" %}
**LEARN MORE**:\
How to [make backups](/guide-for-hideez-key/vault-settings/backups-data-export-and-import#how-to-create-a-backup) and [restore your data](/guide-for-hideez-key/vault-settings/backups-data-export-and-import#recovering-credentials-from-a-backup)\
How to [add](/guide-for-hideez-key/account-management/adding-accounts-for-websites-and-apps.-generating-otps), [edit, ](/guide-for-hideez-key/account-management/editing-existing-accounts)or [delete ](/guide-for-hideez-key/account-management/deleting-accounts)accounts manually\
How to [password-protect local applications](https://key4.hideez.com/guide-for-hideez-key/account-management/adding-accounts-for-websites-and-apps.-generating-otps#adding-password-protection-for-local-applications)\
How to [generate one-time passwords](https://key4.hideez.com/guide-for-hideez-key/account-management/adding-accounts-for-websites-and-apps.-generating-otps#enabling-otp-input-for-your-accounts) for 2FA
### Step 9: Set up proximity-based desktop logon and logoff
### Desktop Logoff
To automatically lock your computer when you step away from it, check the **“Use this device to lock the PC”** box in the Vault settings. You can adjust the distance you need with a slider. Your desktop will be locked when the Bluetooth signal level falls below the specified value in % and unlocked when the Bluetooth signal level exceeds the specified value in %.
{% hint style="warning" %}
We recommend setting intervals between values to at least 40. Optimal values are 30% for desktop logout and 70% for desktop login.
{% endhint %}
### Desktop Logon
If you want to use the Hideez Key to unlock your desktop on the basis of proximity, check the **Use this device to Unlock the PC** checkbox in the **Vault settings** section.
1\) You will need to add your **Primary account.** Enter the password for the account associated with your PC (e.g., Local user account, Domain user account, Azure AD, Microsoft account) to activate PC logon.
2\) You will have a choice between three methods to unlock your computer:
* [Initiate Unlock on the PC Lock screen](/guide-for-hideez-key/vault-settings/pc-locking-unlocking-methods-proximity-settings#initiate-unlock-on-the-pc-lock-screen) — the computer is unlocked as soon as the distance threshold reaches the specified value, the user performs the preferred action and clicks on the inscription **Click here to unlock with HK\-<5 first digits of the serial number>**
* [Wait for user activity](/guide-for-hideez-key/vault-settings/pc-locking-unlocking-methods-proximity-settings#wait-for-user-activity) — the computer is unlocked as soon as the distance threshold reaches the specified value and the user performs any preferred action (clicks the mouse / presses any key on the keyboard)
* [Automatic unlock](https://key4.hideez.com/guide-for-hideez-key/vault-settings/pc-locking-unlocking-methods-proximity-settings#automatic-unlock) — the computer is unlocked automatically as soon as the distance threshold reaches the specified value.
**LEARN MORE:**\
How to [add a Primary account](/guide-for-hideez-key/vault-settings/creating-primary-account-to-unlock-your-pc) to unlock your PC\
How to [set up locking / unlocking methods](/guide-for-hideez-key/vault-settings/pc-locking-unlocking-methods-proximity-settings)\
How to [hide unlock option if you don't use it](#desktop-logon)
### Step 10: Enable Passwordless sign-in across FIDO2 & FIDO U2F websites
Hideez Key supports passwordless authentication standards ([FIDO U2F and FIDO2](https://fidoalliance.org/specifications/)) developed by the FIDO Alliance. FIDO specifications are currently supported by over 300 popular websites and applications in Google [Chrome](https://blog.chromium.org/2018/09/chrome-70-beta-shape-detection-web.html), Mozilla [Firefox](https://blog.mozilla.org/blog/2018/05/09/firefox-gets-down-to-business-and-its-personal/), Microsoft [Edge](https://learn.microsoft.com/en-us/entra/identity/authentication/concept-fido2-compatibility?tabs=web), and Apple [Safari](https://webkit.org/blog/8517/release-notes-for-safari-technology-preview-71/) web browsers.
In order to use Hideez Key as a FIDO2/U2F security key, you will have to pair it with your endpoint devices. The supported devices include:
* Computers running Windows 10 or Windows 11;
* Android devices (version 7.0 and later);
* iOS devices (version 13.3 and later) devices.
Instructions for setting up passwordless login can be found on sites that support FIDO2 and FIDO U2F specifications (e.g. Google, Microsoft, Facebook, Twitter, Dropbox, and other platforms). You can review the full list of sites supporting FIDO2 and FIDO U2F standards [here.](https://hideez.com/pages/supported-services)
{% hint style="info" %}
**Please note:** You will need to enable the passwordless sign-in method with a security key for each app and website you want to use it with.
{% endhint %}
Typically, a physical security key is added as an extra login method in your account's **Security settings**. Here is a short video guide with an example of setting up a passwordless login to Google account:
{% embed url="" %}
**LEARN MORE:**
How to enable [passwordless sign-in and 2FA](/passwordless-sign-in-and-2fa/setting-up-passwordless-logins-and-2fa) with the Hideez Key \
How to pair the Hideez Key with [Windows](/passwordless-sign-in-and-2fa/pairing-hideez-key-with-windows-10) and [Android ](/passwordless-sign-in-and-2fa/using-hideez-key-with-android-devices)devices\
How to pair the Hideez Key with [iOS](/passwordless-sign-in-and-2fa/pairing-hideez-key-with-macos-ios-devices) devices
### Step 11: Physical Access (optional)
You can use Hideez Key as an RFID keycard. The device contains an RFID module that can be programmed to open an electronic door in your house, office, or gym.
You may ask **authorized locksmith service** to clone your exiting key fob on Hideez Key.
{% embed url="" %}
Learn more: [How to use Hideez Key as an RFID card](/physical-access/use-hideez-key-as-an-rfid-card)
{% endembed %}
### Additional Info
How to [change your master password](/guide-for-hideez-key/vault-settings/changing-master-password)\
How to [wipe data from a lost/stolen device](/guide-for-hideez-key/service-operations/wiping-the-device)\
How to [update the Hideez Client](/upgrading/untitled)
### Any Questions?
{% hint style="info" %}
We offer online help to assist customers with their inquiries. \
Please write at [support@hideez.com ](mailto:support@hideez.com)to get in touch our support team member.
{% endhint %}
# Configuration app
If you need to change connection type (BLE/CSR) or change application mode (Standalone/Enterprise), you can find the "Configuration" file in the folder of the installed Hideez Client.
In addition, you can change the Hideez Client language in this utility.
{% hint style="warning" %}
You need admin rights on the computer to run this utility.
{% endhint %}
**Program Files > Hideez > Client > Configuration**
Choose the desired options and click the “Apply” button. Please, note that after the application configuration change to enterprise mode, you have to provide the Hideez Server Address.
# Hideez Client Interface & Main Settings
Hideez Client – Interface and Settings
The left panel is as follows:
* Application name (1) and version (2)
* Hideez key serial number and firmware version (3)
* Bluetooth signal strength (4) (as the distance from the computer to the Hideez key increases, the value decreases)
* Battery level (5) (hover to display)
* Vault settings – menu item for displaying basic settings (6)
* Password Manager – a menu item for the password management (7)
* Settings – menu item for general settings (8)
* Help –– link to the documentation portal (9)
* Bluetooth Indicator (10)
You can see such button:
It means that the authorization procedure for accessing the data stored on the key failed. Another indication is the red "Authorized" indicator. In this case, the **Password Manager** menu section will not be displayed.
### Vault settings
Basic information about Hideez Key is displayed:
* Hideez Key name
* Serial number
* MAC address
* % free storage space (accounts are stored in dedicated storage 80KB)
* Firmware version
* Bootloader version
Indicators:
* **Connected** – connection between Hideez Key and the User's endpoint. A green light means a connection is established, a red light means there is no connection. To establish a connection, the Hideez Key must be kept within the range of the PC Bluetooth connection and paired with the PC via Bluetooth.
* **Authorized** – a secure channel has been established between the application and Hideez Key.
* **Storage loaded** – the status of data load from the key. The green indicator means that the key is authorized, the data is uploaded and the **Password manager** menu item is available. A red indicator means that the key cannot pass authorization.
### **Password manager**
Information about all user accounts (account name and login) is displayed. Use the search by account name and login to quickly find the desired account.
Unlock accounts are marked with a corresponding icon in the general list of accounts - and for them can be edited only passwords from the **Vault settings** section on the corresponding PC.
### Reconnect security keys
# Main Settings
Hideez Key — General settings
### General
Go to the **General** block in the **Settings** section.
* **Reconnect security keys**. This option is available only if you use Hideez Key on Windows 10/11 with built-in Bluetooth and have installed Hideez Client. If your Hideez Key is paired with Windows but does not automatically connect to the Hideez Client, you can use the forced connection option. Go to the Settings section and click the Reconnect paired vaults button.
* **Enter passwords only to secure fields** checkbox allows entering a password only into special secure fields. If the checkbox is inactive, the password can be entered into any text field.
* **Always open the window in maximized mode** checkbox allows you to open the Hideez Client in full screen.
* **Automatically press Enter after the password and OTP input** allows for confirming entry to web services or apps after filling in the password or OTP.
* **Disable notification (non-critical)** allows does not display non-critical notifications.
* **Automatically checking for the application update** allows notifying and installing the last version of Hideez Client directly throw the installed Hideez Client.
* **Automatically entering credentials into the applications** allows filling credentials into the application after automatic launching. [This option is suitable for using RDP](/guide-for-hideez-key/hideez-client-interface-and-main-settings/main-settings/automatic-rdp-launch-and-logon).
* **Automatically launch applications after password manager storage is loaded** enables the application to launch after automatic startup. [This option is suitable for RDP usage](/guide-for-hideez-key/hideez-client-interface-and-main-settings/main-settings/automatic-rdp-launch-and-logon).
* **Cashe password manager in memory** This option allows the Hideez Client to cache the password manager during a single session. When the vault is disconnected from the workstation during a single Hideez Client session, the password manager remains cached in the program's memory. Thus, Hideez Client does not need to reload all data again once the key is reconnected to the program; the vault is ready for immediate use.
{% hint style="info" %}
Caching the password manager speeds up device connection by storing non-sensitive data (e.g., account name, login, list of applications) in memory until the program is restarted.
Account passwords, OTPs, and other sensitive data are never cached and are inaccessible without a connected device.
If you close the Hideez Client, all cached data will be deleted. This means that when the program is restarted (e.g., after a PC reboot), the vault will be reloaded.
{% endhint %}
### Logon
Logon settings section is located on the "Settings" tab.
* **Use Hideez as default logon options** allows setting the Hideez credential provider as the default login option.
* **Use Hideez as default logon option for RDP** allows set the Hideez credential provider as a default RDP logon option.
* **Hide Hideez workstation logon option.** If you don't use Hideez workstation logon option, you can enable this option.
* **Lock the workstation upon FIDO key removal.** If this checkbox is set, the workstation will be locked after the FIDO key is removed from the USB port.
{% hint style="warning" %}
ONLY Yubico devices are supported option **Lock the workstation upon FIDO key removal.**
{% endhint %}
### Language
Go to the **Language** block in the **Settings** section.
Select the desired language (English or Ukrainian).
Hideez Client language will be changed automatically.
## Hotkeys
To conveniently configure hotkey combinations, go to the **Hotkeys** block in the **Settings** section.
### Delete/disable hotkey combination
To turn it off, make the checkbox next to the desired combination inactive (1).
To delete, click on the Trash icon next to a specific combination (2).
### Redefining actions and hotkeys
Actions currently available:
* creating a new account
* login input
* password input
* OTP input
To redefine an action, select the required action from the drop-down list (1).
To redefine a combination of hotkeys, go to the field (2) and press the desired combination. It will be substituted and saved.

### Adding hotkeys
If you have deleted any of the combinations, you can add it again or add several combinations for the same action.
1. Click the **Add a hotkey** button.
2. Select an action.
3. Specify a keyboard shortcut
## Reset to default settings
You can always go back to the default hotkey settings. \
1\. Click the **Reset to default** button.\
2\. Confirm your action.
# Automatic RDP Launch and Logon
This feature allows to automatically start RDP connection to specified workstation and automatically enter credentials if they are requested by this connection.
These features can be used independently from each other.
### **Automatic RDP Logon**
To set up automatic logon into RDP, perform the following steps:
* Open Hideez Client settings page, scroll down to ‘**Experimental**’ section and select ‘***Automatically enter credentials into applications***’ option\
\
* Create a new or edit an existing account according to the following requirements
* Enter remote computer name into account name field (e.g. DESKTOP-68U4A)
* Enter remote user name into login field (e.g. User1)
* Enter remote user password into password field
* Click ‘Add Application’ button, scroll to the end and select ‘**automate:mstsc**’
* Click ‘Save’ button
{% hint style="warning" %}
Then you have to restart your PC for the changes to take effect.
{% endhint %}
{% hint style="info" %}
**Note:** Hideez Client can only perform automatic credentials entry if vault is authorized and password manager storage is loaded. If password manager storage is not yet loaded, automatic credentials entry will not be performed.
{% endhint %}
If everything is configured correctly, next time when RDP prompts user to enter credentials for specified workstation, Hideez Client will try to automatically use credentials from account saved in it’s storage.
If the computer name and/or username displayed by the credentials prompt doesn’t match those saved in the password manager, automatic credentials entry will not be performed.
{% hint style="info" %}
**Note:** Currently if more than one account is saved with ‘automate:mstsc’ application, only the first one will be used, where order is determined by internal vault firmware
{% endhint %}
{% hint style="info" %}
**Note:** Due to certain technicalities, currently this feature is only implemented for the English localization of Windows
{% endhint %}
### **Automatic RDP Launch**
To configure RDP to start automatically, follow these steps:
* Open Hideez Client settings page, scroll down to the ‘**Experimental**’ section and select the ‘***Automatically launch applications after the storage is loaded***’ option
* Create a new or edit an existing account according to the following requirements
* Enter remote computer name into account name field (e.g. DESKTOP-68U4A)
* Click ‘Add Application’ button, scroll to the end and select ‘**automate:mstsc**’
* Click ‘Save’ button
If everything is configured correctly, next time when password manager finishes loading storage, Hideez Client will initiate RDP connection to the workstation using the computer name specified in the saved account.
{% hint style="info" %}
**Note:** If an instance of RDP application is already running in the current local user session, automatic RDP launch will not be performed.
{% endhint %}
{% hint style="info" %}
**Note:** Currently if more than one account is saved with ‘automate:mstsc’ application, only the first one will be used, where order is determined by internal vault firmware.
{% endhint %}
# Account management
Hideez Key — Account management
See the instructions for creating and managing your accounts:
[How to import your data to the Hideez Client](/guide-for-hideez-key/vault-settings/backups-data-export-and-import#importing-your-data-to-the-hideez-client)\
[How to add new accounts and enable OTPs](/guide-for-hideez-key/account-management/adding-accounts-for-websites-and-apps.-generating-otps#enabling-otp-input-for-your-accounts)\
[How to add password protection to applications](/guide-for-hideez-key/account-management/adding-accounts-for-websites-and-apps.-generating-otps#adding-password-protection-for-local-applications)\
[How edit existing accounts](/guide-for-hideez-key/account-management/editing-existing-accounts)\
[How to delete accounts](/guide-for-hideez-key/account-management/deleting-accounts)\
[How to create backups and restore your data](/guide-for-hideez-key/vault-settings/backups-data-export-and-import#backups-and-exporting-your-data-from-the-hideez-client)
{% hint style="info" %}
**There are two ultimate login options:**\
\
**- Pressing the hotkeys**\
a) Ctrl+Alt+L = login\
b) Ctrl+Alt+P = password\
c) Crtl+Alt+O = OTP\
\
**- Pressing the Hideez Key's button**\
a) 2 clicks = login\
b) 3 clicks = password\
c) 4 clicks = OTP
{% endhint %}
# Adding accounts for websites & apps. Generating OTPs
Hideez Key — Adding accounts for websites & apps. Generating OTPs
### Adding new accounts to the Hideez Client
{% embed url="" %}
Click the "+" sign at the bottom of the page to create an account.
OR use a shortcut **Ctrl + Alt + A** to open a window for adding an account from an application or site. In this case, the account name and application / site fields will be pre-populated and can be edited.
Enter your account details in the window that appears:

* **Account name** - any name that is convenient and understandable for you
* **Login** - the login used to get into the account
* **Password** - the password used to get into the account. You can enter it manually or generate it by clicking the icon at the end of the line. If you generate a password, be sure to update it on your existing account.
* **Web-site / app** - The addresses of the websites where this account can be used and the names of the applications. Click the **Add Web-site** button to add a website address and the button **Add application** to choose a application name.
Use the drop-down list to select one of the addresses you used previously, or \ to enter a new one. After entering the address, press 'Enter' or the icon to save it, or to delete it.

You can add an unlimited number of website addresses to a single account. You can delete or edit them by hovering over the address line and clicking the corresponding icon.

{% embed url="" %}
{% hint style="info" %}
**There are two ultimate login options:**\
\
**- Pressing the hotkeys**\
a) Ctrl+Alt+L = login\
b) Ctrl+Alt+P = password\
c) Crtl+Alt+O = OTP\
\
**- Pressing the Hideez Key's button**\
a) 2 clicks = login\
b) 3 clicks = password\
c) 4 clicks = OTP
{% endhint %}
### Enabling OTP Input for your accounts
{% embed url="" %}
OTP Secret - you can paste the secret key, on the basis of which one-time passwords are generated here. Typically, such a key is displayed as a QR code on the computer screen and is intended to be scanned by the application on the phone. For example, this is how you set up OTPs for a Google account:

You can press the button in Hideez Client to scan the QR code automatically. In this case, the QR code should be visible on the screen when the Hideez Client application is minimized.

You can also add the secret manually. In this case, you will need to click on the link "CAN'T SCAN IT?". A window will open in which the same code will be presented in text form:

Copy this text and paste it into the **OTP** field in the Hideez Client application.

### Adding password protection for local applications
{% embed url="" %}
Click the **Add application** button to add an application

and select one from the list of applications running on your computer. If the application is not listed, it must be launched. Follow the same procedure to add the next application.
The process of removing and editing applications is the same as for websites.

# Editing existing accounts
Hideez Key — Editing existing account
In the **Password manager** section, double-click the account line to open the detailed information. Click **Edit** and go to the account data editing window.

Please note that the **Save** button will only appear if you have made any changes.
You can:
* Change your login
* Enter a new password manually or generate a complex password in the client interface by clicking the corresponding icon in the password field.
* Add or change the sites and applications in which the account is registered. If no site or application is listed, the account will be used to log into the computer. There is no limit on the number of sites and applications for an account. You can choose applications from the list of running apps.
* Specify or change the OTP secret.
The changes will take effect once you save them.
{% embed url="" %}
{% hint style="info" %}
**There are two ultimate login options:**\
\
**- Pressing the hotkeys**\
a) Ctrl+Alt+L = login\
b) Ctrl+Alt+P = password\
c) Crtl+Alt+O = OTP\
\
**- Pressing the Hideez Key's button**\
a) 2 clicks = login\
b) 3 clicks = password\
c) 4 clicks = OTP
{% endhint %}
# Deleting accounts
Hideez Key — Deleteing accounts
To delete an account, go to the **Password manage**r section and double-click on the line with the account to open detailed information. Click the Trash icon.
Hideez Client will ask you to confirm the deletion, and the account will be deleted after confirmation.
# Vault Settings
Hideez Key — Vault Settings
# Creating Primary account to unlock your PC
Hideez Key — Creating and managing an account to unlock PC
If you want to use Hideez Key not only to enter credentials into applications, but also to unlock your PC, you need to add a **Primary account,** an account for unlocking your PC. Such an account can only exist in a single copy per PC user.
### Create an account to unlock your PC
Go to the **Vault settings** section (1) > **Lock and Unlock block** (2), check the **Use this device to Unlock the PC** checkbox (3). After the checkbox becomes active, a block with the already specified username and a field for entering a password will be displayed to the right of it (4). Enter your password. Select the **Unlock mode** (5) and, if necessary, specify the Unlock values for the proximity mechanism (6). Save the changes by clicking the **Save** button (7).
[Learn more about the methods of unlocking your PC and the proximity mechanism](/guide-for-hideez-key/vault-settings/pc-locking-unlocking-methods-proximity-settings).
The account will be saved and displayed in the **Password manager** section.
### Editing an account to unlock a PC
You can edit this account or from the **Vault settings** section. Navigate to the **Lock and Unlock block** and click the **Edit Password** button.
Enter a new password and save your changes.
{% hint style="info" %}
Please, refer to [this](broken://pages/9rUc9NRSzACdPB2S0MIr) article if you want to hide Hideez logon option or set it as default.
{% endhint %}
# Access Settings
Hideez Key — Access Settings

In this block of settings, you can:
(1) - specify what **action** should be requested [**to access the password manager**:](/guide-for-hideez-key/vault-settings/access-settings) pressing the button on the Hideez Key, or entering the PIN-code, or both.
(2) - [**change the master password**](/guide-for-hideez-key/vault-settings/changing-master-password) that you specified when installing Hideez Client.
Also in this section you can set up the storage lock timeout. It is a time after which you have to unlock the key with the required action (button press or PIN code input) again.

There are 8 options in the dropdown list:

Do not forget to save your changes by clicking on the **Save** button.

{% embed url="" %}
# Changing master password
Hideez Key — Changing master password
{% hint style="warning" %}
A master password is required to perform some actions with Hideez Key:
* authorization (a PIN code's analogue in some cases)
* to configure Access settings
* to change the PIN code
It cannot be restored, so take its creation seriously. If you forget it, the only way to restore it is[ to clean HK (Wipe) completely. ](/guide-for-hideez-key/service-operations/wiping-the-device)
{% endhint %}
To change the master password, click on the **Change master password** button in the **Vault settings** section. Enter the current master password, the new one (twice), and click the **Confirm** button.
# PC locking / unlocking methods (Proximity Settings)
Hideez Key — Proximity settings
Hideez Key allows you to set up locking and unlocking your PC with the proximity mechanism. Your PC will be locked when the Bluetooth signal level falls below the specified value in % and unlocked when the Bluetooth signal level exceeds the specified value in %.
{% hint style="warning" %}
Please note that we are talking about % values, and not about absolute distances in meters. The actual distance in meters can vary in different rooms and depend on external factors (the placement of the Hideez Key, the presence of furniture and walls in the room, etc.). You need to experimentally determine the optimal parameters for yourself.
{% endhint %}
{% embed url="" %}
{% hint style="warning" %}
The proximity mechanism is not very stable. The signal can constantly change (even when the key is in one place). In a few seconds, the signal level can change by 30-40 units! This is influenced by many factors: mobile network and other Bluetooth devices, etc. These are the features of the technology itself.
According to our observations, we recommend setting the intervals between the values at least 40. We have chosen the optimal values: \
\- Lock - 30;\
\- Unlock - 70.
{% endhint %}
Go to the **Vault settings** section and the **Lock and Unlock** block to configure Proximity settings. Check the **Use this device** **to Lock the PC** checkbox. The Proximity level setting appears.
## Configure PC Lock by Proximity
1. Check the box next to the **Use this device** **to Lock the PC** option.
2. Adjust with the slider or enter a numeric value in the **Lock** field.
3. Save your changes.

Now, as soon as the Bluetooth signal level drops below the specified value in %, your PC will be locked.
**This is the only configurable way to lock your PC.**
## Configure PC Unlock
1. Check the box next to the **Use this device to Unlock the PC** option.
2. Create an account to unlock your PC. You can read more about working with this type of account [here](/guide-for-hideez-key/vault-settings/creating-primary-account-to-unlock-your-pc).
3. Select a [method to unlock your PC](/guide-for-hideez-key/vault-settings/pc-locking-unlocking-methods-proximity-settings#options-for-unlocking-your-pc).
4. Adjust with the slider or enter a numerical value in the **Unlock** field (only for certain unlocking methods).
5. Save your changes.
The PC Unlock account on the key can be saved even if you disable the option to unlock the PC using Hideez Key. Just click 'No' in the box that appears after unchecking 'Use this device to Unlock the PC' and saving the changes.

### Options for unlocking your PC
#### Initiate unlock on the PC Lock screen
{% hint style="danger" %}
This method is available only when using Hideez Key with a built-in Bluetooth.
{% endhint %}
In order for the PC to be unlocked:
1. the Bluetooth signal level must exceed the specified value in %
2. the user must perform an action (mouse click / key press on the keyboard)
3. the user must click on the inscription **Click here to unlock with HK\-<5 first serial number digits>.**

#### Wait for user activity
This is a kind of proximity unlocking. In order for the PC to be unlocked, 2 conditions must be met:
1. the Bluetooth signal level must exceed the specified value in %
2. the user must perform an action (mouse click / key press on the keyboard)
This method is useful when you are often near the computer. For example, you are passing by, but you do not want it to be unlocked every time.
#### Automatic unlock
Unlocking the PC only by the proximity mechanism. As soon as the Bluetooth signal level exceeds the set value in %, your PC will be unlocked.
{% hint style="info" %}
PC will be unlocked only if PC was blocked by proximity, not manually.
{% endhint %}
{% hint style="info" %}
If there is no Hideez login option on the lock screen, please, [check if the "Hide Hideez workstation logon option" is unchecked](broken://pages/9rUc9NRSzACdPB2S0MIr).
{% endhint %}
# Backups, Data export & import
Hideez Key — Backups, export & import
### Importing your Data to the Hideez Client
{% embed url="" %}
### Backups and Exporting your Data from the Hideez Client
{% embed url="" %}
### How to create a Backup?
**Step 1.** Go to the **Backup / Restore accounts** block in the **Vault settings** section.
**Step 2**. Click the **Backup accounts** button. You will be prompted to save the file with .hvb extension. Come up with an appropriate file name and click **Save**.

**Step 3.** Come up with, remember and enter a password to your archive with credentials, confirm the action with the **Confirm** button. After completing the operation, you will see a message that the archive was successfully created.

### Recovering Credentials from a Backup
**Step 1.** Go to the **Backup / Restore credentials** block in the **Vault settings** section.
**Step 2.** Click the **Restore from Backup** button. You will be prompted to select a .hvb file.

**Step 3.** Enter the password for the file and confirm the action with the **Confirm** button.
{% hint style="danger" %}
All existing credentials will be overwritten with data from the file!
{% endhint %}
Once the current data is cleared, the accounts are restored from the backup.


### Export Credentials as CSV
{% hint style="danger" %}
**Warning! Passwords are stored in plain text. Do not transfer this file to third parties!**
{% endhint %}
**Step 1.** Go to the **Import / Export credentials** block in **Vault settings** section**.** Click '**Export credentials**' button.
**Step 2.** Click on the button with three dots on it. You will be prompted to save the file with .csv extension. Come up with an appropriate file name and click '**Save'** button.
It is also possible to choose which data to export - for web services and/or Windows desktop applications.


**Step 3.** Click '**Start**' button. After completing the operation, you will see a message that the data were successfully saved.


### Import credentials from CSV file
**Step 1.** Go to the **Import / Export credentials** block in **Vault settings** section.

**Step 2.** Click '**Import credentials**' button.
You will be prompted to select a .csv file.

Select the accounts you want to import from the list and click the '**Import**' button.

The data will be uploaded to the key for further use.

# Proximity Lock
Hideez Key — Proximity Lock
To lock your PC, you can:
* use the [Proximity mechanism](#lock-your-pc-by-proximity) - blocking will occur when the Bluetooth signal level drops below a certain value
* [Forcibly lock your PC](/guide-for-hideez-key/proximity-lock#forced-methods-to-lock-your-pc) even when you are near it
### Lock your PC by proximity
You can read about the proximity mechanism and its limitations [here](/guide-for-hideez-key/vault-settings/pc-locking-unlocking-methods-proximity-settings#configure-pc-lock-by-proximity).
The step-by-step algorithm for configuring PC lock by proximity is described [here](/guide-for-hideez-key/vault-settings/pc-locking-unlocking-methods-proximity-settings#configure-pc-lock-by-proximity).
### Forced methods to lock your PC
**Method 1**
Press the **Win + L** key combination on the keyboard. The PC will be locked.\
\
**Method 2**
Unpair key in Windows Bluetooth devices.

# Proximity Unlock
Hideez Key — Proximity Unlock
If you have an internal Windows Bluetooth, you can use following methods to unlock your PC:
\- [Initiate unlock on the PC Lock screen](/guide-for-hideez-key/vault-settings/pc-locking-unlocking-methods-proximity-settings#initiate-unlock-on-the-pc-lock-screen)\
\- [Wait for user activity](/guide-for-hideez-key/vault-settings/pc-locking-unlocking-methods-proximity-settings#wait-for-user-activity)\
\- [Automatic unlock](/guide-for-hideez-key/vault-settings/pc-locking-unlocking-methods-proximity-settings#automatic-unlock)
Be sure to read the description of the proximity mechanism and the algorithm for configuring unlocking methods in the [full article](/guide-for-hideez-key/vault-settings/pc-locking-unlocking-methods-proximity-settings).
{% hint style="info" %}
If there is no Hideez login option on the lock screen, please, [check if the "Hide Hideez workstation logon option" is unchecked](broken://pages/9rUc9NRSzACdPB2S0MIr).
{% endhint %}
# Uninstall Hideez Client app
Hideez Client – Uninstalling Hideez Client
You can uninstall Hideez application in the same way as any program or application on your PC.
Uninstall from the Settings page:
1. Select the **Start** button, then select **Settings > Apps > Apps & features**.
2. Select **Hideez app**, and then select **Uninstall**.
During the uninstall process, you will see the following prompt:
If you click the "Yes" button:
1. Installed application will be removed from **%ProgramFiles%\Hideez\Client\\**
2. Created folders (**"Hideez", "Client"**) will be removed unless other installations depend upon them
3. The registry value **client\_hes\_address** will be removed
4. CSR driver will not be uninstalled
If you choose the "No" or "Cancel" option, user data will be saved in the PC memory, and only the application itself will be deleted.
# Service Operations
Hideez Key — Service Operations
[Firmware Update](/guide-for-hideez-key/service-operations/firmware-update-through-utility)
[Battery maintenance](/guide-for-hideez-key/service-operations/battery-maintenance)
[Wipe the device](/guide-for-hideez-key/service-operations/wiping-the-device)
# Firmware update through utility
Hideez Key — Updating firmware
Utility for Hideez Key's maintenance is already in the folder of the installed Hideez Client application. You can find the latest stable version of Hideez Client [here](/upgrading/untitled).
{% hint style="info" %}
You need admin rights on the computer to run this utility.
{% endhint %}
{% hint style="warning" %}
**Note!** Device Maintenance Application works only on PCs with installed Hideez Client.
{% endhint %}
Navigate to **Program Files > Hideez > Client > Device Maintenance Application**

### Quick Update in Single Mode
Quick mode allows you to update your device to the latest firmware version without entering any settings - everything will be done automatically. Advanced mode allows you to select a specific firmware version. We recommend you always use quick mode, unless for diagnostic purposes, the support service asks you to install a non-latest firmware version.
#### **Step** 1
[Pair Hideez Key with Windows 10-11 via Bluetooth](/guide-for-hideez-key/quickstart-guide#step-3-pair-with-windows-10).
#### Step 2
Run the Device Maintenance Application file and check if the "Bluetooth" radio button is selected. Click **Quick update**.

#### Step 3
The latest firmware version will be automatically selected.

Click **Update**. The firmware download process will begin.

Watch a video on how Hideez Key works during the update.
{% embed url="" %}
#### Step 4
Wait for the process to complete. This may take a few minutes.

{% hint style="warning" %}
**Please note**: if you have disconnected your Bluetooth connection with your key during the firmware installation, you need to reconnect and continue the firmware installation through Advanced mode. Select your key model and the appropriate firmware. You will also need to delete the previous Bluetooth connection and create a new one.
{% endhint %}
### Quick Update in Parallel Mode
If you have several keys to update, you can do this procedure in parallel. Just connect the keys via Bluetooth and wait.

{% hint style="warning" %}
**Note!** Hideez Key functionality is not available during firmware update.
{% endhint %}
### Advanced Update in single mode
#### Step 1
[Pair Hideez Key with Windows 10-11 via Bluetooth](/guide-for-hideez-key/quickstart-guide#step-3-pair-with-windows-10).
#### Step 2
Run the Device Maintenance Application file and check if the Bluetooth indicator is selected. Click **Advanced update**.

#### Step 3
You will have 2 options - select the model and firmware version from the list of available updates on the server, or download the firmware file from a local disk. Select the first option (select a model and version). The second option (select a file) is designed to download debug and test firmware.
Select your key model and firmware version:
Click **Update**. The firmware download process will begin:

Wait for the process to complete. This may take a few minutes.

### Install firmware from the file (for advanced users)
#### Step 1
Navigate to **Program Files > Hideez > Client > Device Maintenance Application**
#### Step 2
[Pair Hideez Key with Windows 10-11 via Bluetooth](/guide-for-hideez-key/quickstart-guide#step-3-pair-with-windows-10) or tap Hideez Key to the [Dongle.](https://dongle.hideez.com/)
#### Step 3
Run the Device Maintenance Application file and check if the Bluetooth or Dongle indicator is selected. Click **Advanced update**.
#### Step 4
Select the download of the firmware file from a local disk. Select the first option and model of the Hideez Key.
#### Step 5
Wait for the process to complete. This may take a few minutes.
# Firmware update through Web
You can update Firmware on your Hideez Key 4 through the web:
### Web updates through Bluetooth:
{% hint style="info" %}
This method is compatible with PCs on Windows operating systems.
{% endhint %}
1. Pair Hideez Key to your PC via Bluetooth.
2. Open the [**Hideez Firmware Update web service.**](https://update.hideez.com/FW_Web_update_app/RELEASE/?advanced=true)
3. Click the button “Update over BLE”.
4. Select your Hideez Key in the window that appears and click **“Connect.”**
5. Choose “Use currently available version for your device: 4.3.XX” and click **“Start update.”**
{% hint style="info" %}
In some cases, you may need to install a specific firmware version. To do this, select "**Load firmware from the file**." Wait for the firmware installation to complete.
{% endhint %}
6. Wait for the firmware installation to complete.
### Web updates through USB:
{% hint style="info" %}
Please note, that updating over USB is possible only with Hideez Key 4 with **Bootloader version 4.4.9:**
{% endhint %}
#### To update the firmware on your Hideez Key to the latest version, follow these steps:
1. Open the [**Hideez Firmware Update web service.**](https://update.hideez.com/FW_Web_update_app/RELEASE/?advanced=true)
2. Connect your Hideez Key to your computer using a Micro USB port.
3. Select “**Update over USB**.”
{% hint style="warning" %}
**Please, notice, that you have to use a micro USB cable that supports data transfer not only charging. Otherwise, you can not install firmware.**
{% endhint %}
4. Select your Hideez Key in the window that appears and click **"Connect."**
5. Choose “Use currently available version for your device: 4.3.XX” and click **“Start update.”**
{% hint style="info" %}
In some cases, you may need to install a specific firmware version. To do this, select "**Load firmware from file**." Wait for the firmware installation to complete.
{% endhint %}
6. Wait for the firmware installation to complete.
# Battery maintenance
Hideez Key – Battery maintenance
Hideez Key comes with a pre-installed battery.
{% hint style="success" %}
In case your Key does not switch on, please, check if you [removed the white plastic](/guide-for-hideez-key/quickstart-guide#step-0-remove-isolating-material-from-the-keys-housing) from the Key's housing.
{% endhint %}
### Hideez Key 4 Battery
To recharge the battery you need to plug a Micro-USB connector to the corresponding port located on the side of the fob. Wait until the LED indicator becomes green. Hideez Key 4 will be ready for work.
The lifespan of a lithium-ion rechargeable battery like the **LIR2032 3.7 V** can be influenced by several factors. Here are some key considerations: charge and discharge cycles, temperature, charge Level, overcharging and over-discharging, and quality of the battery.
While many factors can influence lifespan, a typical lithium-ion battery might last for numerous years under normal usage conditions.
### Replace the battery
If for some reason you need to replace the battery, please follow the next instructions.
The case is made of two halves latched together.
To replace the battery, open the case and lift the gap between the halves with a fingernail or a plastic card. Do not use metal objects. Remove the old battery by pushing it from the inside using a narrow plastic object. Install the new **LIR2032 3.7 V** battery on the narrow side (minus contact) of the board. Hideez Key will start to work.
{% hint style="info" %}
**Hideez Key** **4** has a battery **LIR2032 3.7 V (RECHARGEABLE)**
**We highly recommend using the Hideez Key with the corresponding type of battery.**
{% endhint %}
Opening the case.

Changing the battery.

{% hint style="info" %}
Notice: if you don’t want to change the battery by yourself, you can contact any electronic service center that replaces watch batteries.
{% endhint %}

# Wiping the device
Hideez Key — Wiping the device
{% hint style="danger" %}
Wipe is a process of complete and irrevocable data deletion from your Hideez Key.
{% endhint %}
In order to wipe the device, go to the **Vault settings** section and click the **Wipe** button at the bottom of the page.
Check out the notification and confirm your decision by clicking the **Start wipe** button.
Once you confirm the wipe, the button will flash yellow, press and hold it for 10 seconds.

{% hint style="warning" %}
To cancel the Wipe procedure, make a single press on the button on the device at any time before the end of Wipe.
{% endhint %}
# How to get log files from Hideez Client
You can get log files from your Hideez Client in the next way:
In the according folder, which will be opened by click, you can find logs from the **Service** and **Client**.
# Pairing Hideez Key with Windows
Hideez Key – Pairing with Windows
Hideez Key devices support passwordless authentication stadards developed by the FIDO Alliance: [FIDO U2F and FIDO2](https://fidoalliance.org/specifications/). You can pair Hideez Key with any devices supporting FIDO Security Keys, including computers running Windows 10/11, Android (version 7.0+) or iOS (version 13.3+) devices.
Services that support these standards include Google, Facebook, Twitter, and Dropbox, and [other](https://hideez.com/pages/supported-services).
{% hint style="warning" %}
For successful pairing of the Hideez Key, you will need a Windows 10, OS build 1840, or later. For earlier versions, the correct operation of the device is not guaranteed. \
[How to find out which version of Windows your device is running.](https://support.microsoft.com/en-us/help/13443/windows-which-version-am-i-running)
{% endhint %}
You can pair [Hideez Key 3](https://hideez.com/products/hideez-key-3) and [Hideez Key 4](https://hideez.com/products/hideez-key-4) devices to your Windows PC with the following steps:
### **Pairing FIDO security keys with Windows 10-11**
1. Select **Start** > **Settings** > **Devices** > **Bluetooth & other devices**.\
2. Press (short press) the button on the Hideez Key device.
After you press a device button, a blue LED lights up - three long flashes of variable brightness, which means that the device is ready for Pairing.
3. Click **Add Bluetooth or other devices > Bluetooth** on the Windows screen.\
4. Select your Hideez Key device (for example HK-00203). The last five digits should coincide with the serial number printed on the device box.\
5. After the connection is established, the green LED lights up (blinks) on the selected device, inviting you to confirm the operation. You need to confirm pairing with a short button press. \
If you don’t confirm the operation within 15 seconds, there will be no pairing and the LED on the device will stop blinking. \
{% embed url="" %}
6. Successful pairing is confirmed by the inscription «Your device is ready to go».
7. In the Bluetooth & other devices section, a new HK4-00203 device appears.\
### **Creating a PIN code on a Hideez Key device**
{% hint style="info" %}
The PIN code created for Secure Device for Windows (FIDO) may differ from the PIN code in Hideez Client.
{% endhint %}
Windows uses another technology to securely store, transfer, and verify the PIN code.
1. Select **Start** > **Windows Settings** > **Account** > **Sign-in options** > **Security Key** > **Manage**
2. After clicking on the **Manage** button, the Hideez Key will require confirmation of this operation with a short press on the button. If you don’t confirm it in 20 seconds, Windows reports the problem and restarts the operation. \
3. A "Windows Hello setup" window appears with the menu "Add Security Key PIN" and "Reset Security Key". \
{% embed url="" %}
4. Select “Add PIN to Security Key” and enter the same PIN code containing 4 to 32 digits twice.\
### **Changing PIN code for FIDO technology**
Go to the “Windows Hello setup” section and select “Change Security Key PIN” to change the PIN code. Next, you need to type your old PIN followed by a new one (twice) and click “OK”.\
### **Removing PIN code and clearing all FIDO data**
1. Enter the “Windows Hello setup” section and select “Reset Security Key” and then “Proceed” to remove the PIN code and FIDO data. \
2. Each time the message “Take action on your Bluetooth security key” appears, confirm it with a short press. This action must be confirmed twice.
{% embed url="" %}
3. The success of the operation is signaled by the message “Reset Complete”. After that, all data associated with FIDO (PIN, accounts) will be removed.\
After the Hideez Key has been successfully paired with your computer, you can proceed to [setting up a passwordless login](/passwordless-sign-in-and-2fa/setting-up-passwordless-logins-and-2fa) to the desired accounts.
{% hint style="info" %}
After pairing you can also set up the [proximity lock](/guide-for-hideez-key/proximity-lock) and [unlock](/guide-for-hideez-key/proximity-unlock) options (without the dongle).
{% endhint %}
# Using Hideez Key 4 with macOS and Linux via USB
Hideez Key 4 supports passwordless authentication standards developed by the FIDO Alliance: FIDO U2F and FIDO2. You can connect Hideez Key to any devices that support FIDO security keys, including PCs on MacOS (version macOS 11 Big Sur+), Windows 10/11, as well as mobile devices with Android (version 7.0+) or iOS (version 13.3+).
{% hint style="info" %}
Services supporting these standards include Google, Facebook, Twitter, Dropbox, and others. If you are using macOS or Linux, you can manage Hideez Key using tools integrated into the latest Chromium-based browsers, such as Google Chrome (starting from v80).
{% endhint %}
### Firmware Update for Hideez Key on MacOS and Linux
To update the firmware on your Hideez Key to the latest version, follow these steps:
#### For macOS:
1. Open the [**Hideez Firmware Update web service.**](https://update.hideez.com/FW_Web_update_app/RELEASE/?advanced=true)
2. Connect your Hideez Key to your computer using a USB Type-C port.
3. Select "**Update over USB**."
{% hint style="info" %}
For Linux create a file named "/etc/udev/rules.d/10-hideez.rules" and add the following line to the file:
KERNEL=="hidraw\*", ATTRS{idVendor}=="1915", MODE="0666"
{% endhint %}
4. Select your Hideez Key in the window that appears and click **"Connect."**
5. Choose "Use currently available version for your device: 4.3.XX" and click **"Start update."**
{% hint style="info" %}
In some cases, you may need to install a specific firmware version. To do this, select "**Load firmware from file**." Wait for the firmware installation to complete.
{% endhint %}
6. Wait for the firmware installation to complete.
{% hint style="info" %}
After the firmware is installed, you can proceed with the basic settings for the key on MacOS and Linux:
* Key activation
* Setting up a PIN code
* Setting up a fingerprint
* Resetting the Hideez Key
{% endhint %}
### Activation and Management of Hideez Key on MacOS and Linux
Here are the instructions for joining and activating Hideez Key:
1. Install a Chromium-based browser on your macOS or Linux computer, such as [Google Chrome](https://www.google.com/chrome/) (starting from v80).
2. To access the security key management interface, go to "Settings."
3. Click on "Privacy and Security" and select "Security."
4. Click on the option "Manage Security Keys."
4. Connect Hideez Key to your computer via USB and choose the necessary action.
### Activate the Key and create a PIN code
To create a PIN code for your Hideez Key, click on "Create a PIN." Follow the on-screen instructions, press the button on the Hideez Key when prompted, and enter and save the PIN code.
{% hint style="info" %}
After pressing the "Save" button, your Hideez Key will be protected with the PIN code you specified. Please note that this PIN code will be required for all operations described in this article, except for resetting the key. After three incorrect attempts to enter the PIN code, the system will prompt you to disconnect and reconnect the key. If subsequent attempts with the PIN code are also unsuccessful, the key needs to be reset (all keys will be erased) to use it again.
{% endhint %}
### You can also change the PIN code after its initial setup.
Enter the current PIN, and new PIN, and confirm the PIN code. After completing these steps, the PIN code for your Hideez Key will be updated.
### Resetting your security key
To reset your security key, you can use this option. For this operation, there is no need to enter the PIN code but be aware that all account data and website associations stored on the device will be erased.
# Adding Hideez Key 4 to your Google Account on macOS and Linux
To add your Hideez Key to your Google Account, follow these steps:
1. Sign in to your [**Google Account**](https://www.google.com/account/about/) using a web browser on your computer.
2. Go to the “Security” section in your Google Account settings.
3. Select “Passkeys and security keys.”
4. Choose “Create a Passkey.”
5. In the window that appears, select “Use another device.”
6. Confirm your action and scan your fingerprint using the Hideez Key or enter the PIN code.
7. Follow the on-screen instructions to complete the process of adding your Hideez Key to your Google Account.
8. Confirm your action and scan your fingerprint using the Hideez Key or enter the PIN code.
{% hint style="info" %}
After adding your Hideez Key to your Google Account, you'll be able to sign in to your account without entering a password, using only your email. This provides FIDO2 authentication.
{% endhint %}
# Adding Hideez Key 4 to your Microsoft account on macOS and Linux
{% hint style="info" %}
The Microsoft account serves as a universal login method for various services, including Microsoft 365, Microsoft Entra (Azure AD), Office, Outlook.com, OneDrive, Family Safety, Skype, Bing, Microsoft Store, and MSN.
IPI Key enables the use of passwordless authentication in the Microsoft account using biometrics.
{% endhint %}
To add your Hideez Key to your Microsoft Account on MacOS and Linux, follow these instructions:
1. [**Activate your Hideez Key and set up a PIN code**](/passwordless-sign-in-and-2fa/using-hideez-key-4-with-macos-and-linux-via-usb#activation-and-management-of-ipi-key-on-macos-and-linux)**.**
2. Sign in to your [**Microsoft Account.**](https://login.microsoftonline.com/)
3. Navigate to the "**Security Info"** section.
4. Choose **"Add Sign-in method" -> "Security Key" -> "USB Device".**
5. Follow the instructions and press the button on your Hideez Key to confirm the action, either by scanning your fingerprint or entering the PIN code. You can also add a name for your Hideez Key or edit it in your Microsoft account settings.
6. Your Hideez Key will be added to your Microsoft account.
{% hint style="info" %}
After adding your Hideez Key to your Microsoft Account, you can sign in to your Microsoft account and Azure AD portal without a password, using only your login, thanks to FIDO2 Authentication.
{% endhint %}
# Pairing Hideez Key with Android devices
Hideez Key – Using with Android devices
{% hint style="warning" %}
A Password Manager functionality is available ONLY on Windows 10/11.
{% endhint %}
The Android operating system (version 7.0 and higher) allows the use of hardware security keys for login to accounts based on the [FIDO U2F](https://fidoalliance.org/specifications/) standard. Services that support this standard include Google, Facebook, Twitter, Dropbox, and [others](https://hideez.com/pages/supported-services).
{% hint style="info" %}
**The device can be connected to your Android device's via NFC / micro-USB connection.**
{% endhint %}
Below is a demonstration of setting up a two-factor authentication (2FA) for Google account on Android devices:
{% embed url="" %}
{% embed url="" %}
After the Hideez Key has been successfully paired with your computer, you can proceed to [setting up a passwordless login](/passwordless-sign-in-and-2fa/setting-up-passwordless-logins-and-2fa) to the desired accounts.
# Using Hideez Key with iOS devices
Hideez Key – Using with iOS devices
{% hint style="warning" %}
[**Hideez Key 4**](https://hideez.com/products/hideez-key-4) can only be connected to your iOS devices via NFC / micro-USB connection.
{% endhint %}
iOS operating system allows the use of the hardware security keys for passwordless logins into accounts based on the [FIDO U2F and FIDO2](https://fidoalliance.org/specifications/) standards. Services that support FIDO login methods include Google, Facebook, Twitter, Dropbox, and [other ](https://hideez.com/pages/supported-services)platforms.
**Minimum System Requirements:**
* iOS 13.3 or higher
Physical FIDO2-compliant security keys are supported by the Safari Web browser (version 13.0.4 or higher) and third-party applications (such as Gmail, Facebook, etc.) on iOS.
You don't need to pair the Hideez Key with your iOS device, you only have to follow the desired service's official guidelines.
# Setting up passwordless logins and 2FA
Hideez Key – Passwordless authentication and 2FA
Once you have paired Hideez Key with your devices, you can set up passwordless authentication or two-factor authentication on websites supporting FIDO U2F and FIDO2 standards.
FIDO specifications are currently supported by Google [Chrome](https://blog.chromium.org/2018/09/chrome-70-beta-shape-detection-web.html), Mozilla [Firefox](https://blog.mozilla.org/blog/2018/05/09/firefox-gets-down-to-business-and-its-personal/), Microsoft [Edge](https://support.microsoft.com/en-us/account-billing/set-up-a-passkey-fido2-as-your-verification-method-2911cacd-efa5-4593-ae22-e09ae14c6698#:~:text=Go%20to%20the%20My%20Profile,Security%20key%20and%20click%20Next.) and Apple [Safari](https://webkit.org/blog/8517/release-notes-for-safari-technology-preview-71/) web browsers.
{% hint style="info" %}
You will need to enable the passwordless sign-in method with a security key for each app and website you want to use it with.
{% endhint %}
### Enable passwordless 2FA with the Hideez Key
Follow the steps below to enable FIDO U2F authentication:
1\) Log into the account you would like to use your Hideez Key with and navigate to Security settings.
2\) Typically, there is an option for enabling 2FA and registering your security key. Follow the on-screen instructions to register the key.
3\) Next time you log into your account the system will request you to connect your security key and confirm your authentication.
{% embed url="" %}
To set up passwordless two-factor authentication in Gmail, Facebook, Twitter and/or a host of other services, no additional software is needed. You can follow the instructions of any U2F-supporting services to use the Hideez Key as your second factor.
### Here are some of the websites and their documentation on FIDO U2F:
* [Google account](https://support.google.com/accounts/answer/6103523)
* [AOL](https://help.aol.com/articles/2-step-verification-with-a-security-key)
* [AWS Single Sign](https://docs.aws.amazon.com/singlesignon/latest/userguide/user-device-registration.html)
* [AWS Identity and Acess Management (IAM)](https://docs.aws.amazon.com/IAM/latest/UserGuide/id_credentials_mfa_enable_u2f.html)
* [Basecamp](https://3.basecamp-help.com/article/443-two-factor-authentication-2fa#use-a-security-key)
* [Binance](https://www.binance.com/en/blog/security/how-to-use-binance-authenticator-for-2fa-with-your-binance-account-and-app-906042226348357526)
* [Bitbucket](https://support.atlassian.com/bitbucket-cloud/docs/enable-two-step-verification/)
* [Boxcryptor](https://www.boxcryptor.com/ru/help/boxcryptor-account/windows/#two-factor-authentication)
* [Cloudflare](https://blog.cloudflare.com/cloudflare-now-supports-security-keys-with-web-authentication-webauthn/)
* [Coinbase](https://help.coinbase.com/en/coinbase/managing-my-account/verify-my-identity/using-and-managing-security-keys)
* [Dropbox](https://help.dropbox.com/account-access/enable-two-step-verification#How-to-use-a-security-key-fornbspmultifactor-authentication)
* [eBay](https://www.ebay.com/help/account/protecting-account/tips-keeping-ebay-account-secure?id=4872\&st=3\&pos=1\&query=Tips%20for%20keeping%20your%20eBay%20account%20secure\&intent=2%20factor\&lucenceai=lucenceai#section2)
* [Facebook](https://www.facebook.com/help/401566786855239)
* [Gandi.net](https://docs.gandi.net/en/account_management/security/security_key.html)
* [Gemini](https://support.gemini.com/hc/en-us/articles/360044275792)
* [GeolP2](https://support.maxmind.com/hc/en-us/articles/15329017158427-Set-Up-Security-Key-2FA)
* [GitHub](https://docs.github.com/en/github/authenticating-to-github/securing-your-account-with-two-factor-authentication-2fa/configuring-two-factor-authentication#configuring-two-factor-authentication-using-fido-u2f)
* [GitLab](https://docs.gitlab.com/ee/user/profile/account/two_factor_authentication.html#enable-2fa-via-u2f-device)
* [Gluu Server](https://gluu.org/docs/ce/authn-guide/U2F/)
* [GoDaddy](https://ua.godaddy.com/help/dodajte-aparatnij-klyuch-bezpeki-dlya-dvoetapnoyi-perevirki-31900)
* [ISL Online Remote Desktop](https://help.islonline.com/35746/286527)
* [Jira](https://aserve.atlassian.net/wiki/spaces/U2F/pages/746979329/How%2Bto%2Blog%2Bin%2Bwith%2B2FA%2Bfor%2BJira%2Busing%2BU2F%2Bdevice%2Bas%2Bauthentication%2Bsecond%2Bfactor)
* [JumpCloud](https://support.jumpcloud.com/support/s/article/Using-a-Security-Key-with-your-JumpCloud-User-Account)
* [minFraud](https://support.maxmind.com/hc/en-us/articles/15329017158427-Set-Up-Security-Key-2FA)
* [Namecheap](https://www.namecheap.com/support/knowledgebase/article.aspx/10102/45/how-can-i-use-the-u2f-method-for-twofactor-authentication/)
* [Nitrado](https://server.nitrado.net/eng/news2/view/nitrado-highlighted-features-two-factor-authentication/)
* [Nulab](https://support.nulab.com/hc/en-us/articles/7732936736537-How-to-set-up-two-factor-authentication)
* [Opalstack](https://docs.opalstack.com/user-guide/your-account/#multi-factor-authentication)
* [Porkbun](https://kb.porkbun.com/article/119-how-to-secure-your-account-with-a-physical-security-key-using-webauthn)
* [PushCoin](https://knowhow.pushcoin.com/2015/01/12/using-security-key-for-2-step-verification/)
* [Salesforce](https://help.salesforce.com/s/articleView?id=sf.security_u2f_register_security_key.htm\&type=5)
* [Segulink](https://segusoft.freshdesk.com/support/solutions/articles/19000117048-multi-faktor-authentifizierung-mfa-einrichten)
* [Sentry](https://blog.sentry.io/2016/06/22/introducing-2fa)
* [Shopify](https://help.shopify.com/en/manual/your-account/account-security/two-step-authentication#enable-two-step-authentication-with-security-keys)
* [Twitter](https://help.twitter.com/en/managing-your-account/two-factor-authentication#security-key)
* [Twitch](https://help.twitch.tv/s/article/two-factor-authentication?language=en_US)
* [Yahoo](https://help.yahoo.com/kb/-step-verification-security-key-sln35380.html)
* [WSO2](https://docs.wso2.com/display/IS560/Multi-factor+Authentication+using+FIDO)
* [/n software SFTP Drive](https://www.nsoftware.com/kb/articles/yubikey)
Password managers and identity management platforms:
* [1Password](https://support.1password.com/security-key/)
* [Authereum](https://medium.com/authereum/authereum-now-supports-hardware-security-keys-for-two-factor-authentication-2fa-dff699912b97?)
* [Auth0](https://auth0.com/docs/login/mfa/fido-authentication-with-webauthn/configure-webauthn-security-keys-for-mfa)
* [Bitwarden](https://bitwarden.com/help/article/setup-two-step-login-fido/)
* [Dashlane](https://support.dashlane.com/hc/en-us/articles/360021374760-Open-the-web-app-with-your-PIN-code-fingerprint-or-security-key#biometric-unlock)
* [DUO](https://guide.duo.com/security-keys)
* [Egnyte Protect](https://helpdesk.egnyte.com/hc/en-us/articles/360040496691-Multifactor-Authentication-using-FIDO2-WebAuthn-)
* [ESET Secure Authentication](https://support.eset.com/en/kb3648-using-hard-tokens-with-eset-secure-authentication-7157)
* [HelloID](https://docs.helloid.com/hc/en-us/articles/360011028700-How-to-view-your-account-s-security-overview)
* [ID.me](https://help.id.me/hc/en-us/articles/360025737794-How-do-I-add-more-than-one-2-factor-authentication-2FA-method-to-my-ID-me-Account-)
* [Keeper](https://www.keepersecurity.com/blog/2024/01/16/keeper-now-supports-hardware-security-keys-as-a-single-2fa-method/)
* [Okta](https://www.yubico.com/us/works-with-yubikey/catalog/okta/)
* [Oracle](https://docs.oracle.com/en/cloud/paas/identity-cloud/uaids/configure-fido-security.html)
### Set up passwordless sign-in with the Hideez Key
1\) Log onto the website you desire to register your Hideez Key on and go to security settings.
2\) Typically, there is an option for adding a security key for apsswordless sign-in. In that selection, there will be an option to add a security key. Click on that, and follow the instructions to register the key.
3\) Once registered, next time you log in to your account the interface will request you to insert the security key and tap the button to authenticate.
{% embed url="" %}
In order to use Hideez Key as your main verification factor on other FIDO2-enabled websites, please follow the instructions:
* [Centrify](https://docs.centrify.com/Content/CoreServices/Authenticate/U2FAuth.htm)
* [Curity](https://curity.io/resources/learn/webauthn-authenticator/)
* [Microsoft account](https://support.microsoft.com/en-us/windows/sign-in-to-your-microsoft-account-with-windows-hello-or-a-security-key-800a8c01-6b61-49f5-0660-c2159bea4d84)
* [Microsoft Azure Active Directory](https://docs.microsoft.com/en-us/azure/active-directory/authentication/concept-authentication-passwordless#fido2-security-keys)
You can review the full list of websites supporting FIDO U2F and FIDO2 standards [here.](https://hideez.com/pages/supported-services)
# Hideez Client Update
Hideez Key — Hideez Client Update
[Download the latest Hideez Client Application](https://update.hideez.com/update/hideezclient/clientsetup.exe)
# Using Hideez Key as an RFID card
Hideez Key — RFID module
Hideez Key can serve as an electronic key for home, office or gym, etc. Using the RFID features does not require any additional software.
Hideez Key is equipped with RFID module that works on the 125 kHz frequency bandwidth. The RFID antenna with the control unit can be found under the top cover. This module is not connected to the main board and operates independently from the Bluetooth module.
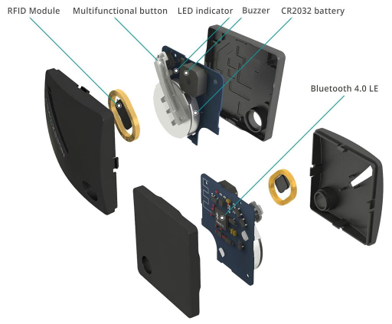
The RFID module is commonly used for identification in access control systems. Hideez Key can work on two different standards: HID or Em-Marine. However, they cannot be used simultaneously. Hideez Key can store only one RFID code at a time.
The key fob comes with a unique code that has already been put in Em-Marine standard. To use it as tag for your RFID-enabled door system, you should ask your **access system provider** to include this code into their system.
This code can be replaced by any other code both in the Em-Marine and HID standard. This procedure requires special hardware called a programmer. This equipment is supplied as a part of commercial access control systems (ACS), or it can be purchased separately.
You may ask **authorized locksmith service** to clone your exiting key fob on Hideez Key.
{% embed url="" %}
# Troubleshooting
#### Windows 11 can not recognize the Hideez Key in the device lists
*After installing the “2023-06 Cumulative Update for Windows 11 Version 22H2 for x64-based Systems (KB5027231)” update, users may encounter difficulties in discovering or pairing Bluetooth devices, including **Hideez Key** and other Bluetooth peripherals. Even devices that are turned on and ready to pair may not appear as available options when attempting to add a Bluetooth device through the Windows system.*
To resolve this:
1. Open **Start** **→** **Settings →** **Bluetooth & devices.**
2. Then click on the section **Devices:**
3. Scroll down to the section **Bluetooth devices discovery** and select the option as **Advanced:**
Now, you should be able to add the Hideez Key to your Windows 11 computer.
{% hint style="warning" %}
If you have any further questions or require additional assistance, don't hesitate to reach out. If you need support, please [contact us](https://hideez.com/pages/contact-hideez-support), and our agent will respond to you via email within 24 hours. Your satisfaction is important to us, and we're here to help!
{% endhint %}

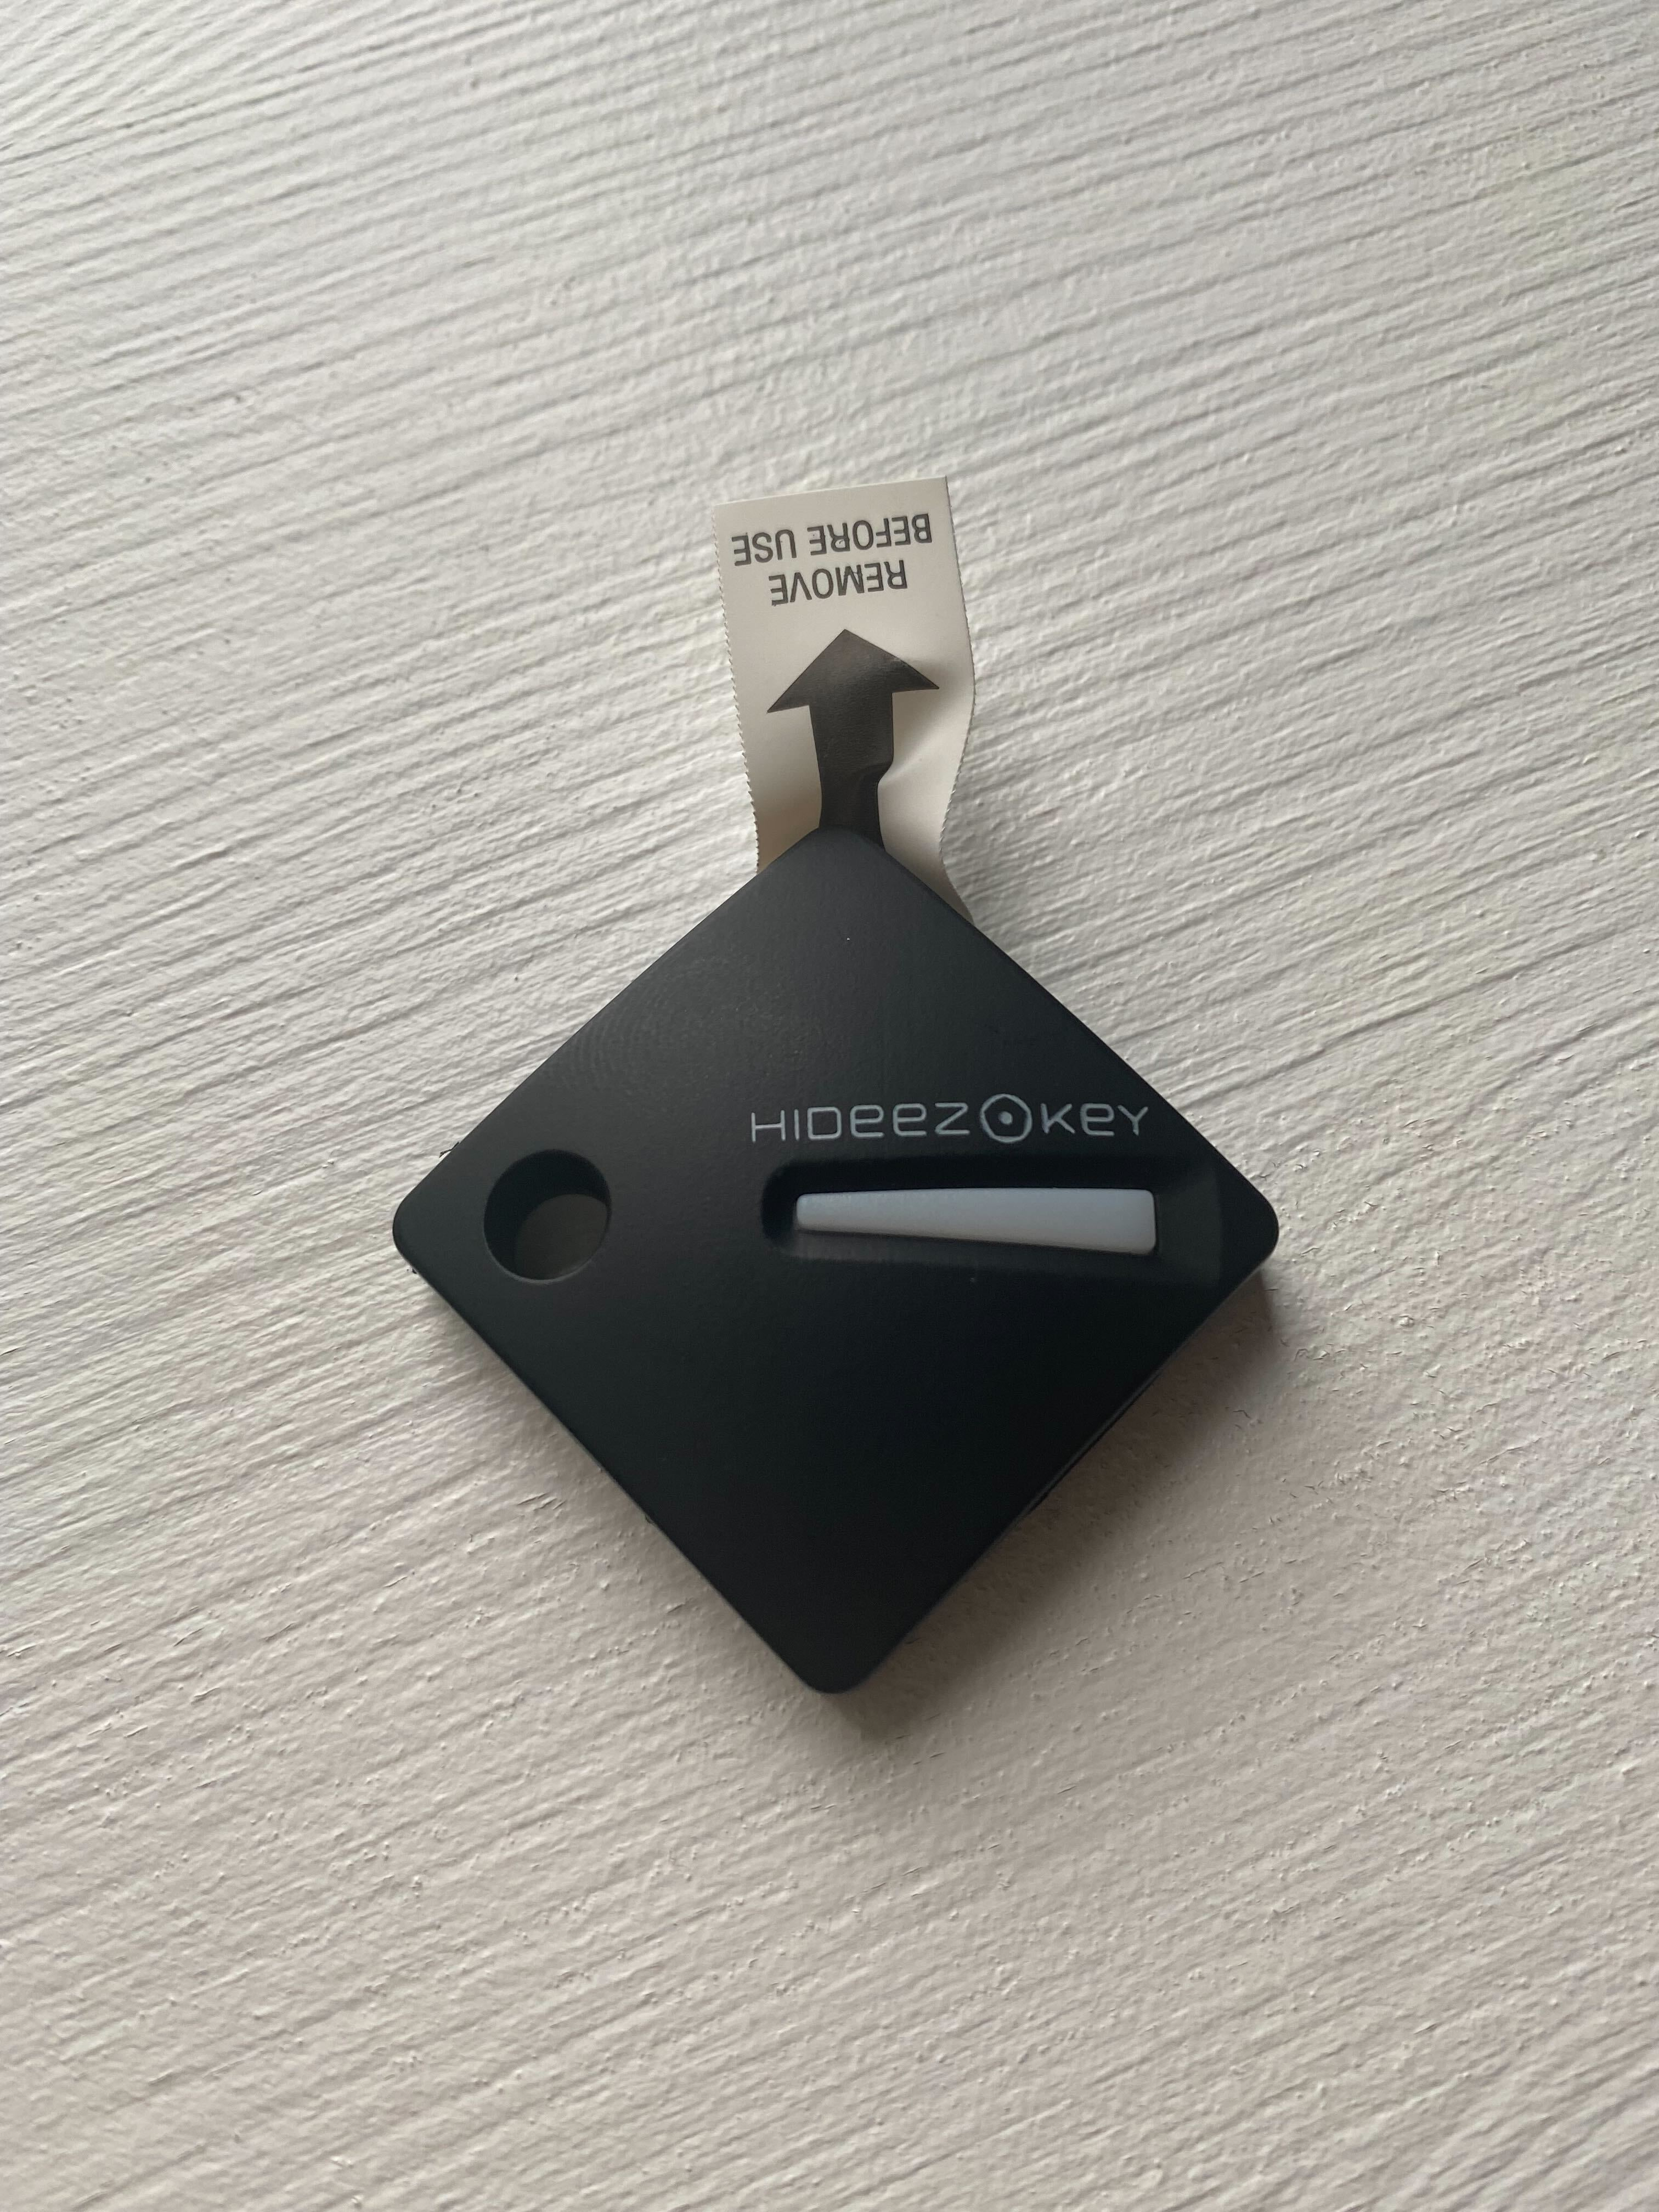
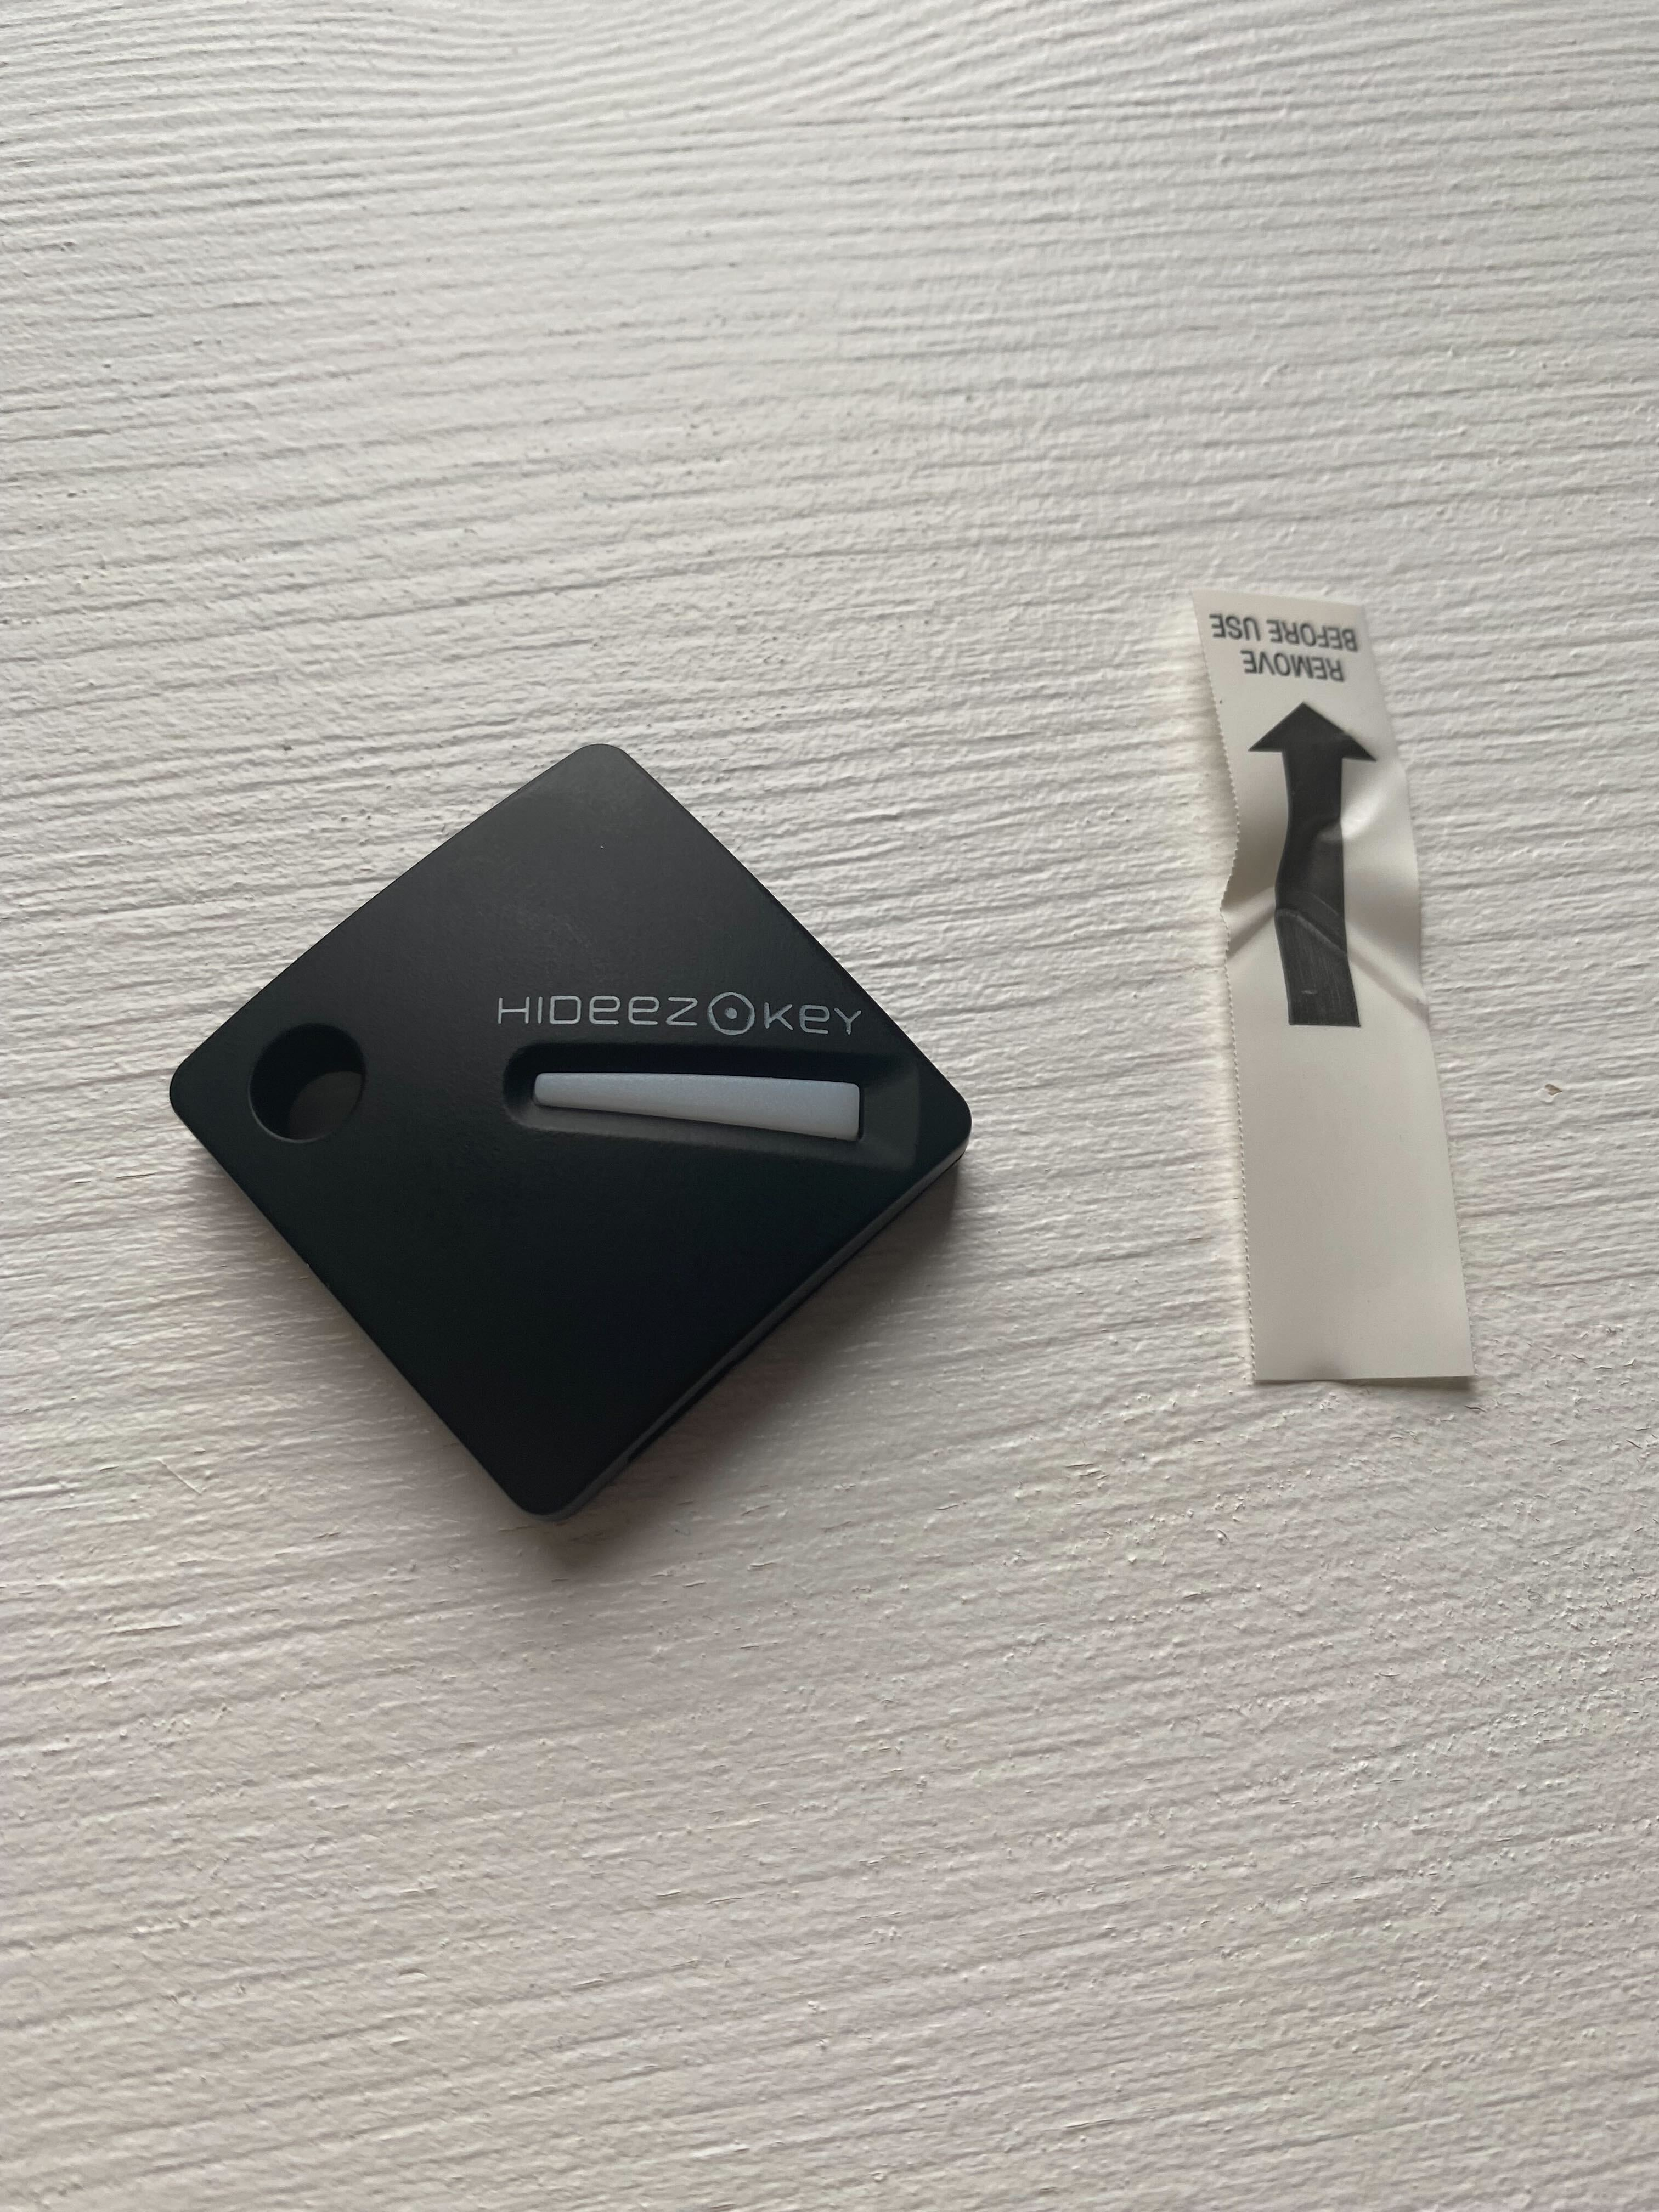 ### Step 2: Install the Hideez Client application
You can download the latest version of the Hideez Client [here](https://update.hideez.com/update/hideezclient/clientsetup.exe).
### Step 2: Install the Hideez Client application
You can download the latest version of the Hideez Client [here](https://update.hideez.com/update/hideezclient/clientsetup.exe).

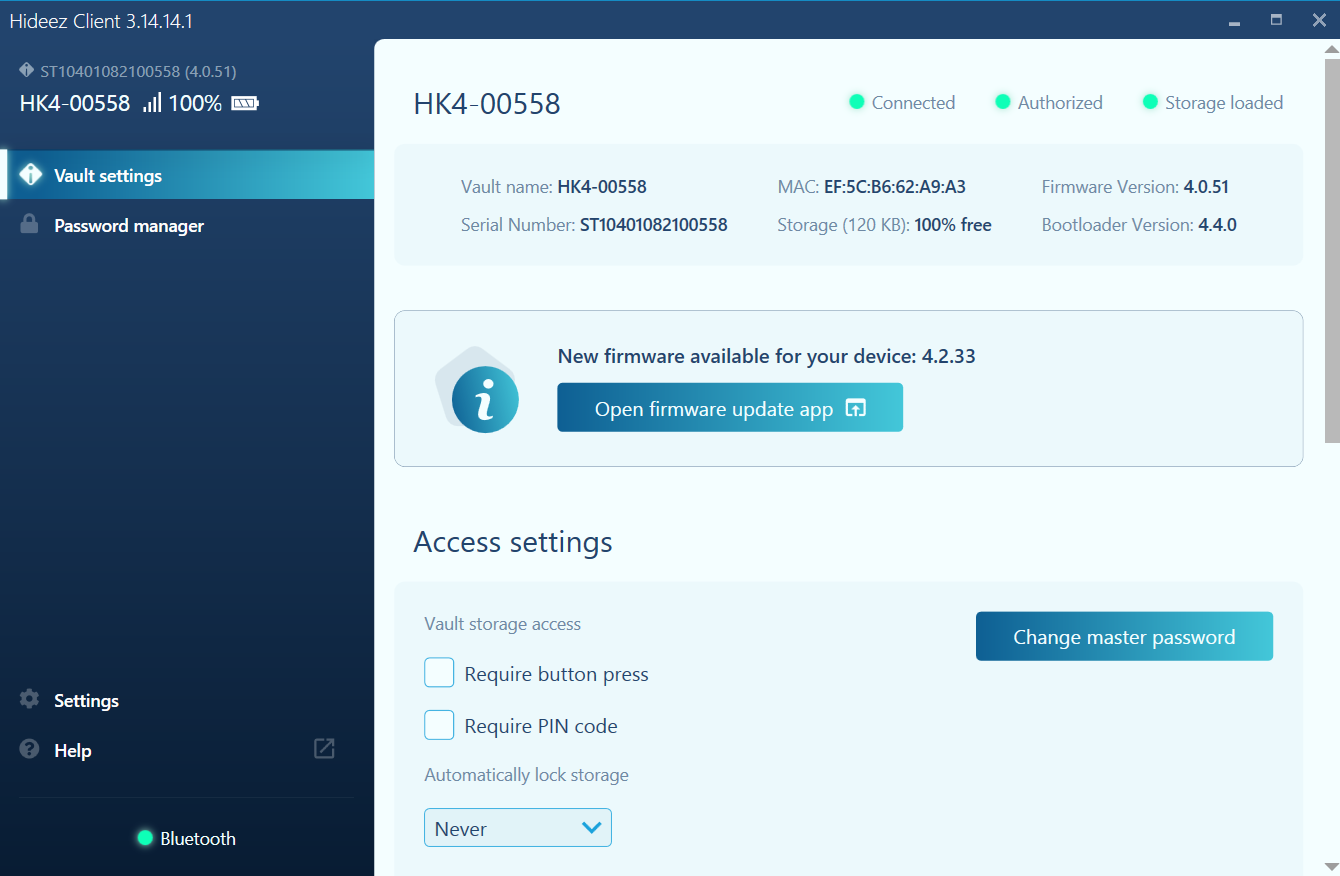
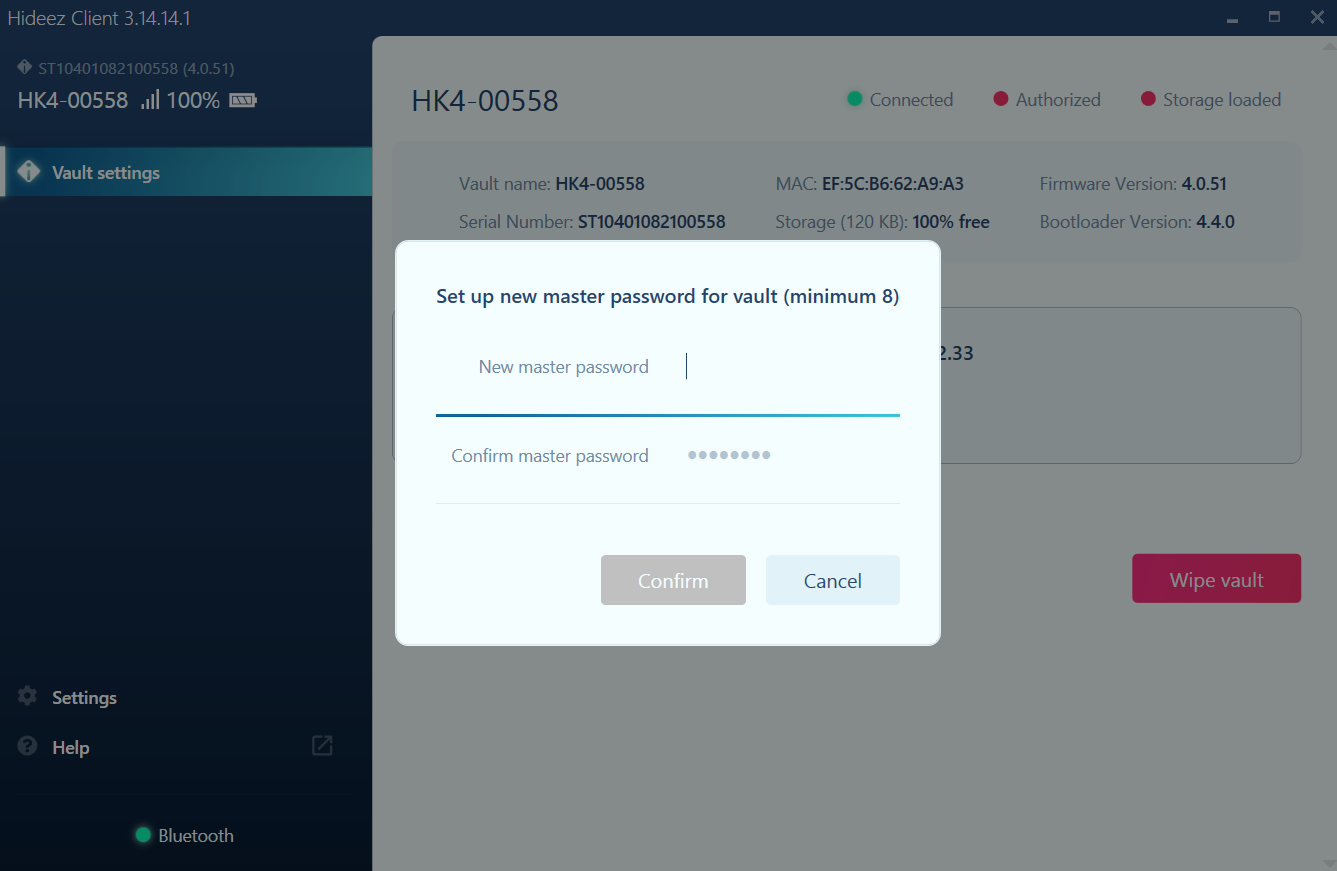
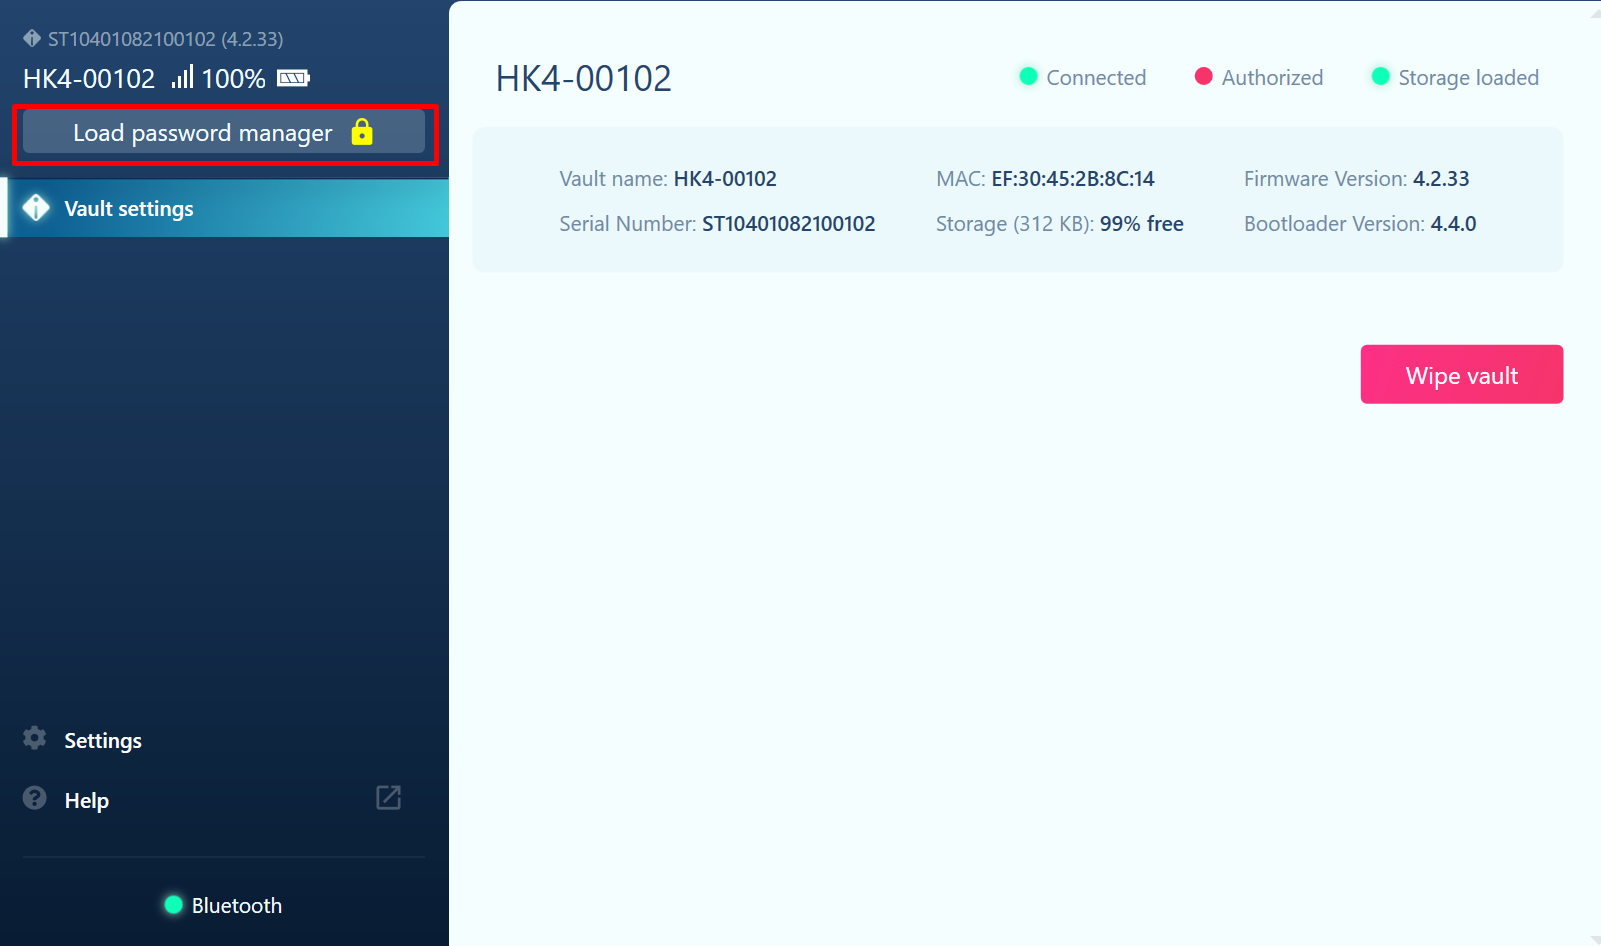
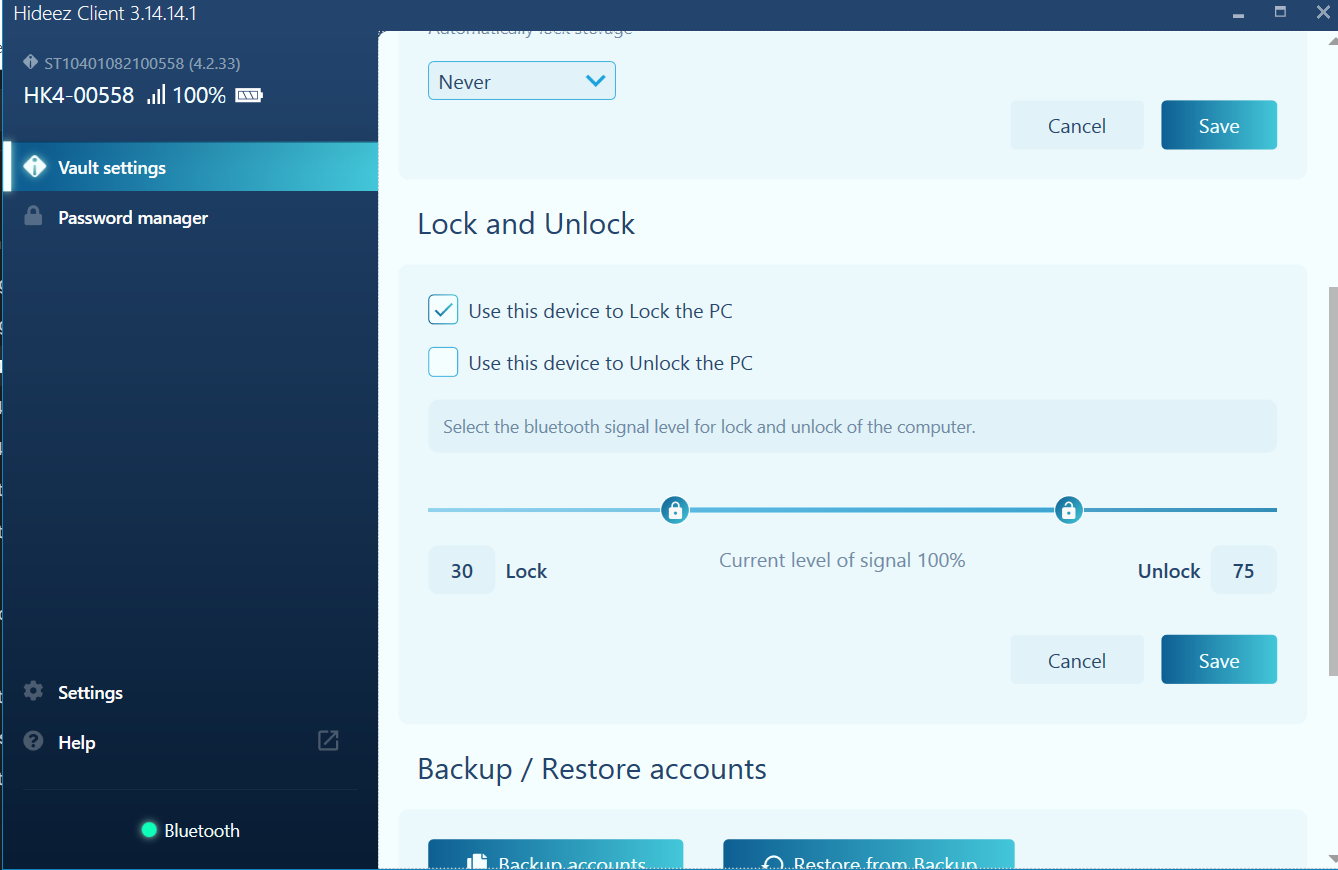
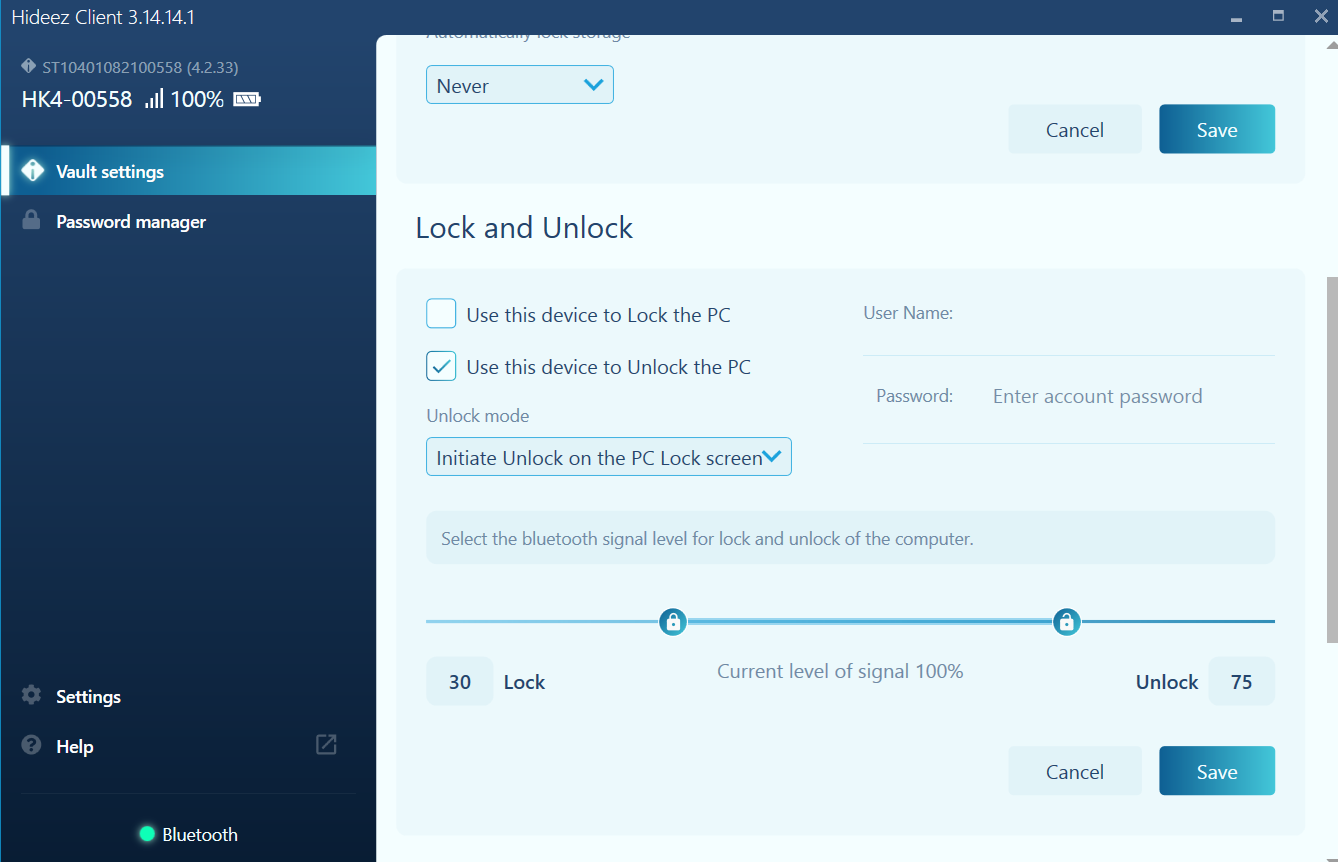
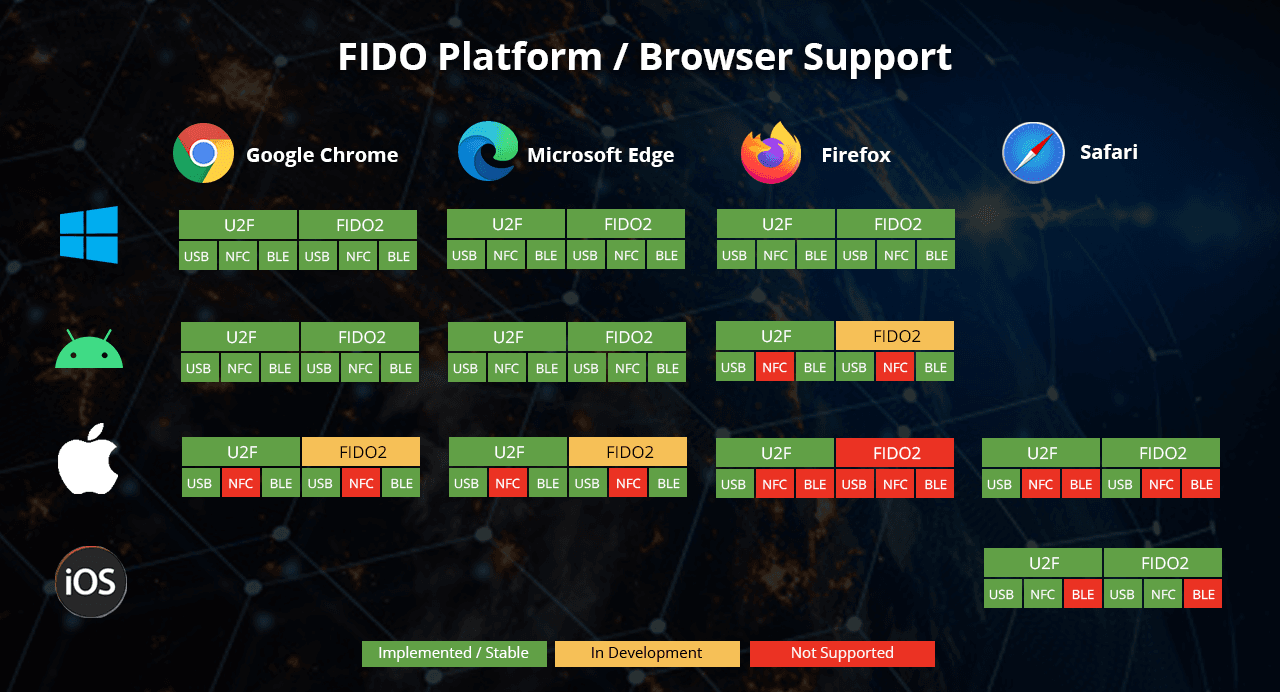
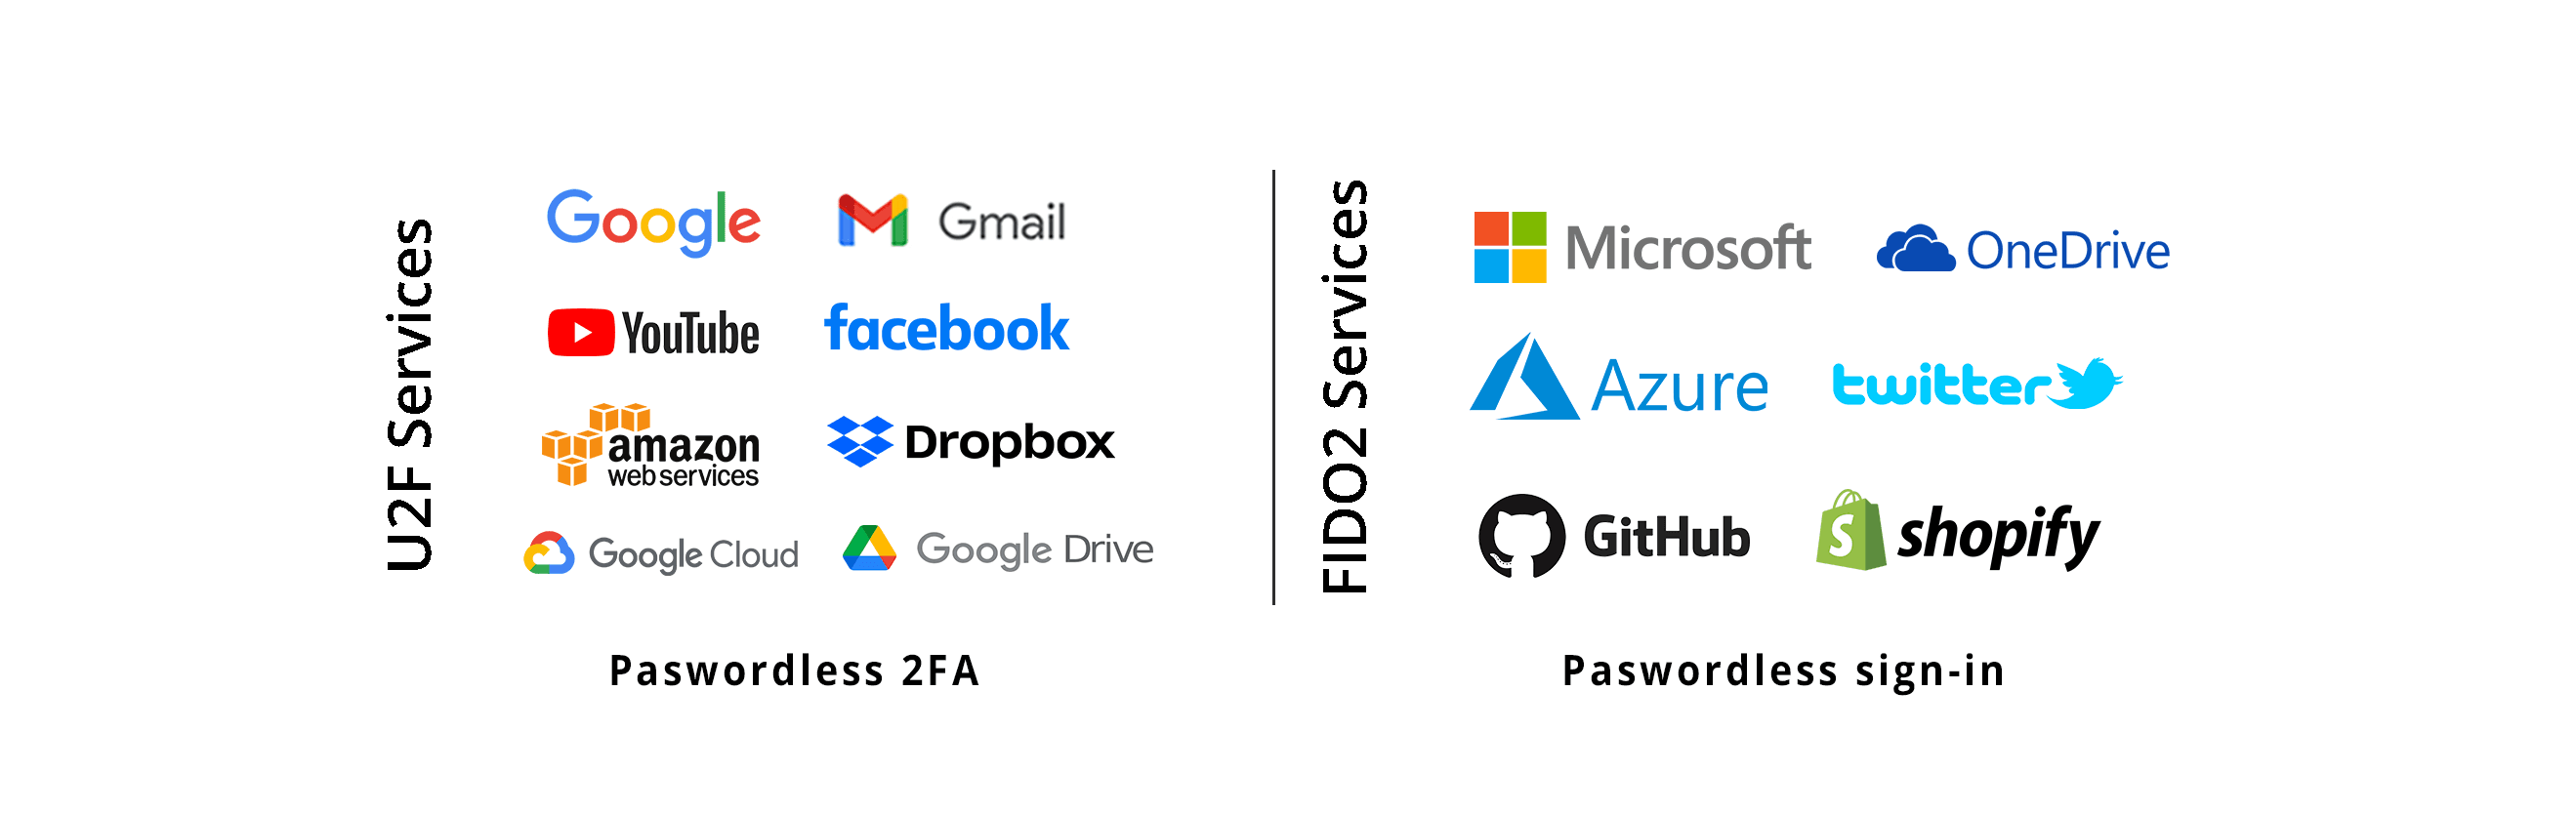


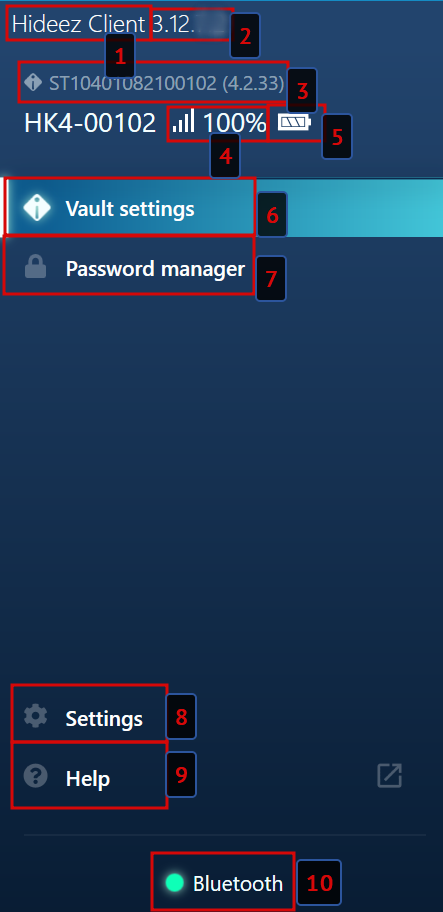
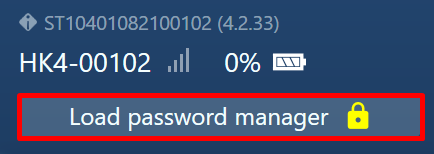

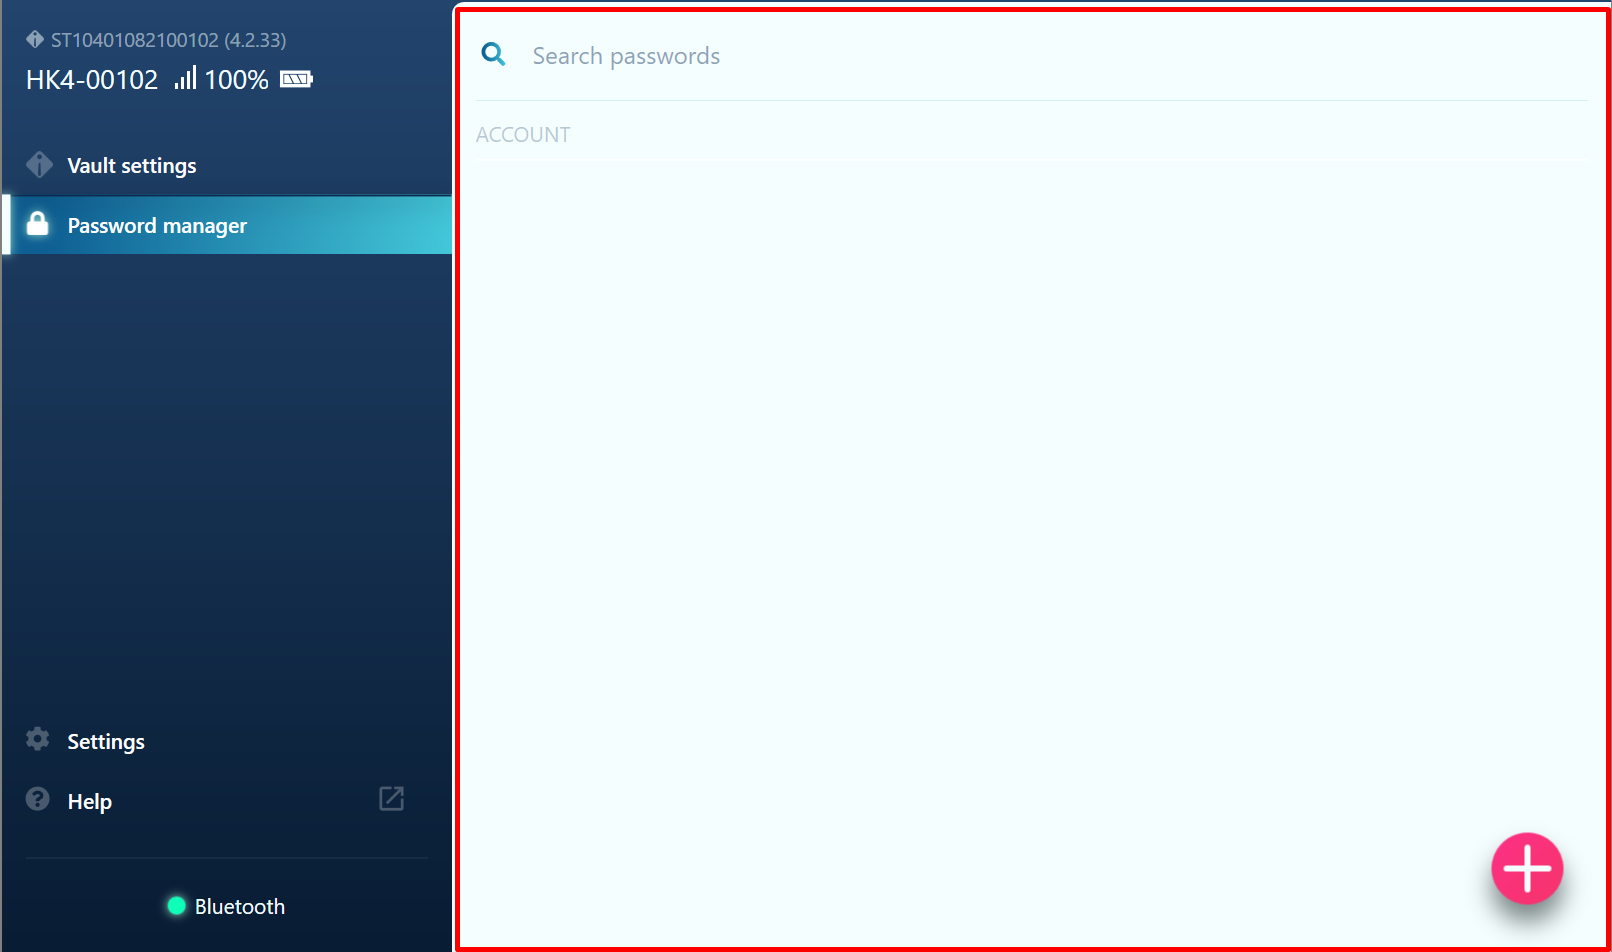
 and for them can be edited only passwords from the **Vault settings** section on the corresponding PC.
### Reconnect security keys
# Main Settings
Hideez Key — General settings
### General
Go to the **General** block in the **Settings** section.
and for them can be edited only passwords from the **Vault settings** section on the corresponding PC.
### Reconnect security keys
# Main Settings
Hideez Key — General settings
### General
Go to the **General** block in the **Settings** section.


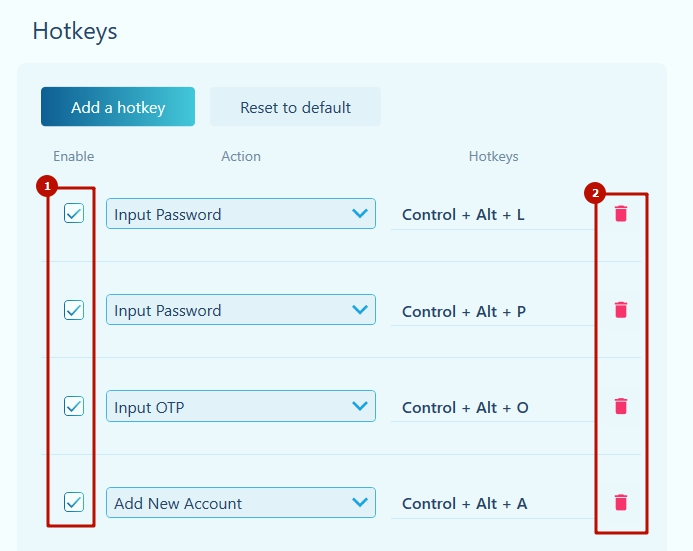 To turn it off, make the checkbox next to the desired combination inactive (1).
To delete, click on the Trash icon next to a specific combination (2).
### Redefining actions and hotkeys
Actions currently available:
* creating a new account
* login input
* password input
* OTP input
To redefine an action, select the required action from the drop-down list (1).
To redefine a combination of hotkeys, go to the field (2) and press the desired combination. It will be substituted and saved.

### Adding hotkeys
If you have deleted any of the combinations, you can add it again or add several combinations for the same action.
1. Click the **Add a hotkey** button.
2. Select an action.
3. Specify a keyboard shortcut
To turn it off, make the checkbox next to the desired combination inactive (1).
To delete, click on the Trash icon next to a specific combination (2).
### Redefining actions and hotkeys
Actions currently available:
* creating a new account
* login input
* password input
* OTP input
To redefine an action, select the required action from the drop-down list (1).
To redefine a combination of hotkeys, go to the field (2) and press the desired combination. It will be substituted and saved.

### Adding hotkeys
If you have deleted any of the combinations, you can add it again or add several combinations for the same action.
1. Click the **Add a hotkey** button.
2. Select an action.
3. Specify a keyboard shortcut
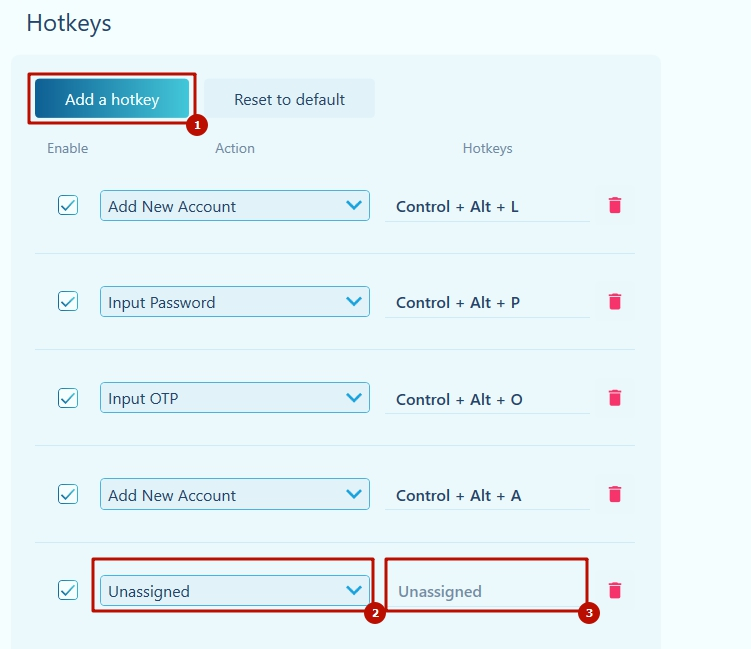 ## Reset to default settings
You can always go back to the default hotkey settings. \
1\. Click the **Reset to default** button.\
2\. Confirm your action.
## Reset to default settings
You can always go back to the default hotkey settings. \
1\. Click the **Reset to default** button.\
2\. Confirm your action.
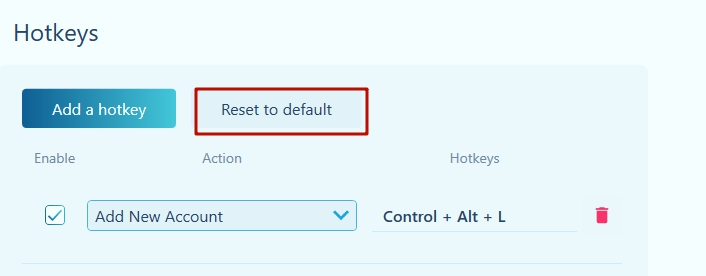
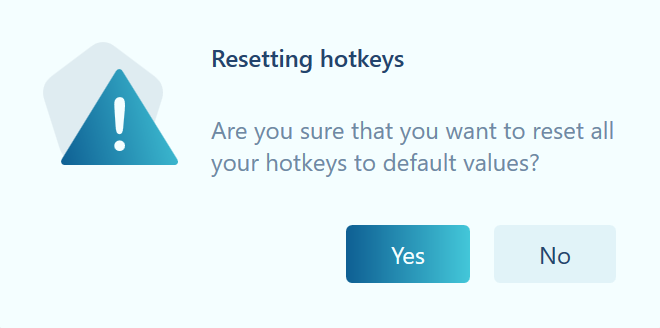
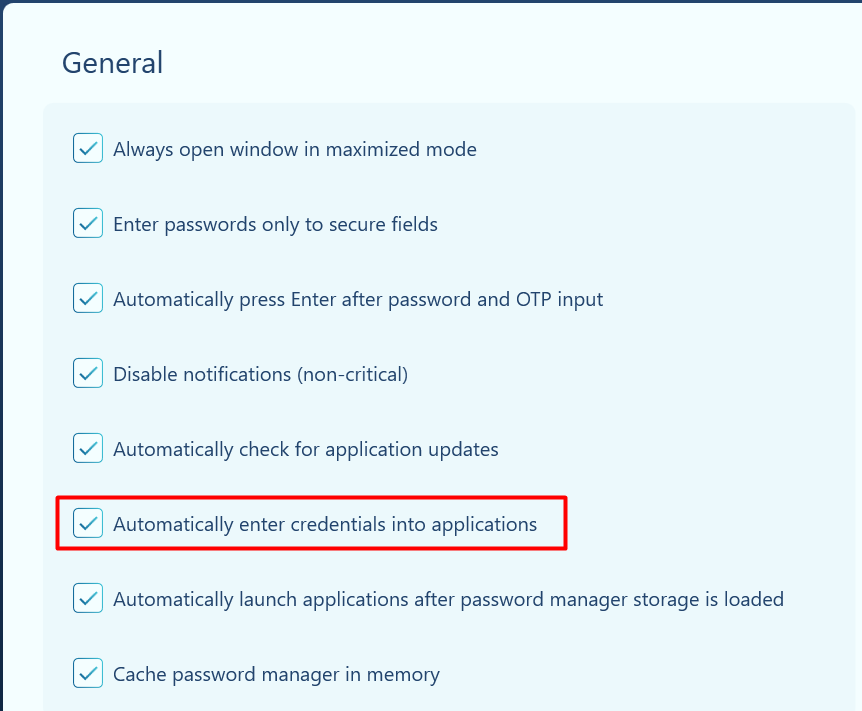

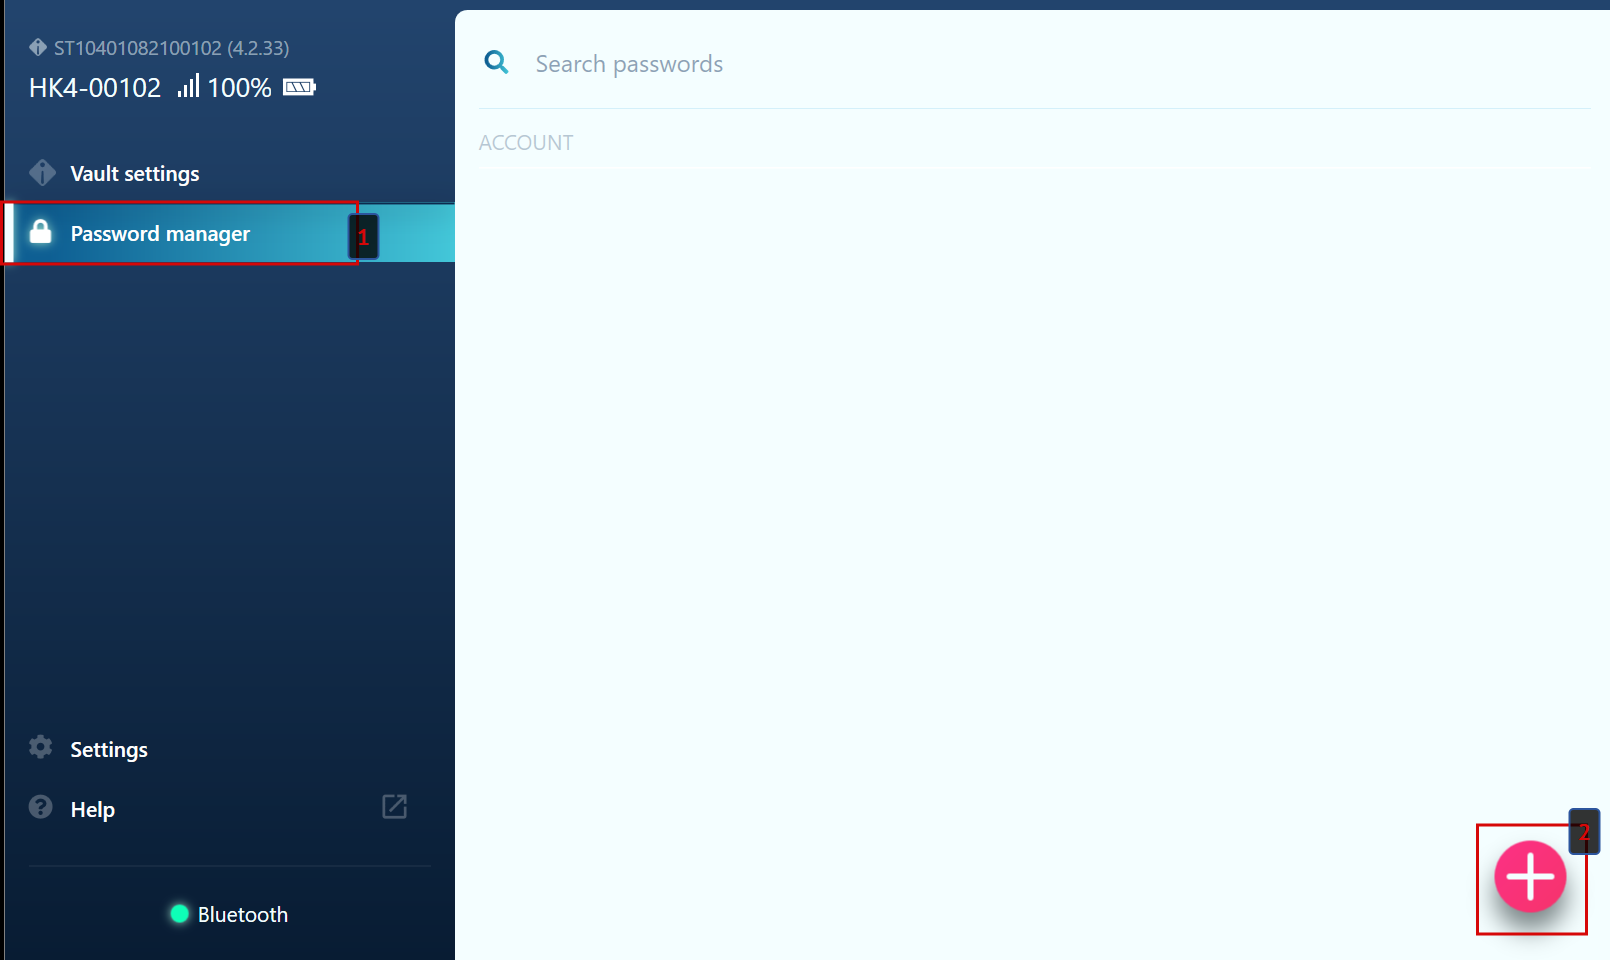
 icon to save it, or
  to delete it.

You can add an unlimited number of website addresses to a single account. You can delete or edit them by hovering over the address line and clicking the corresponding icon.

{% embed url="
to delete it.

You can add an unlimited number of website addresses to a single account. You can delete or edit them by hovering over the address line and clicking the corresponding icon.

{% embed url="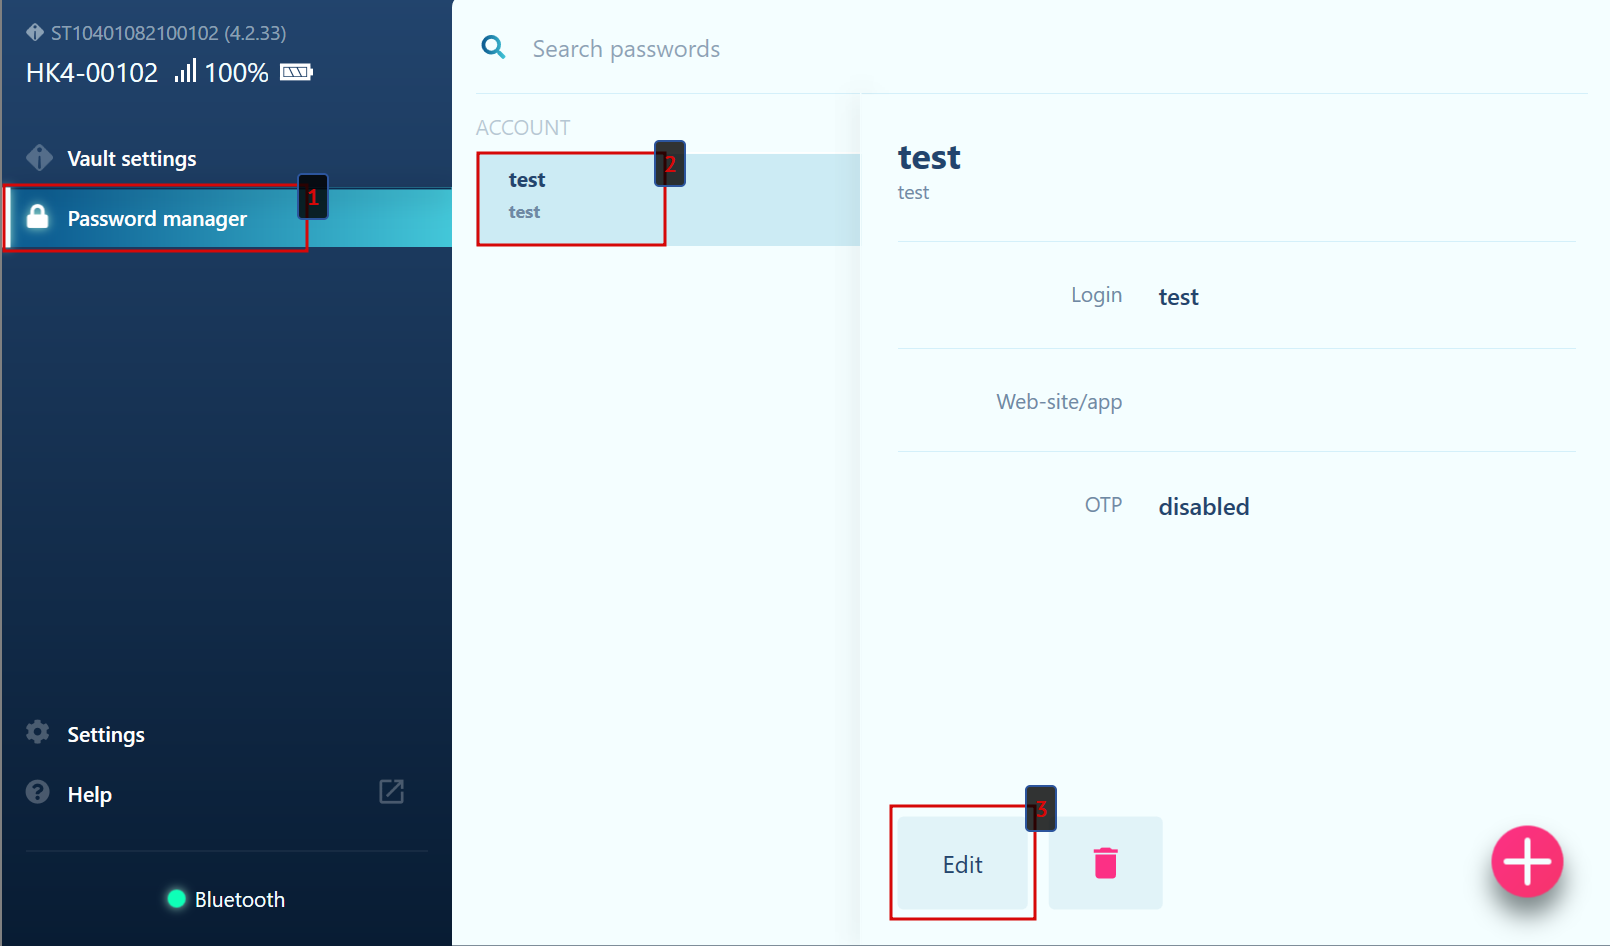
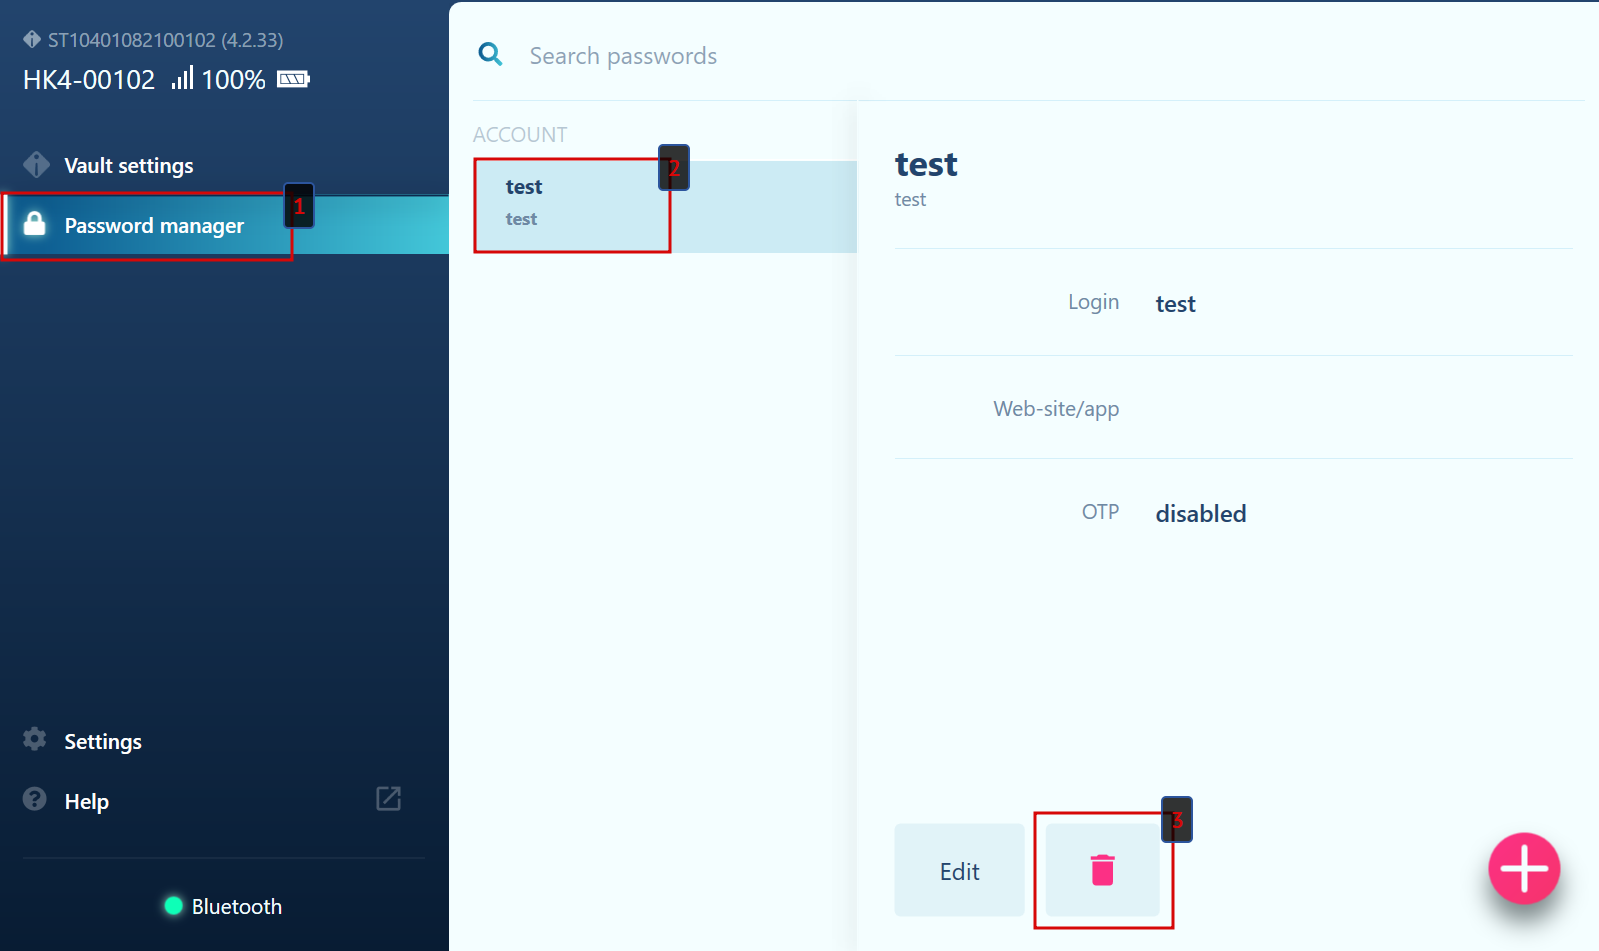
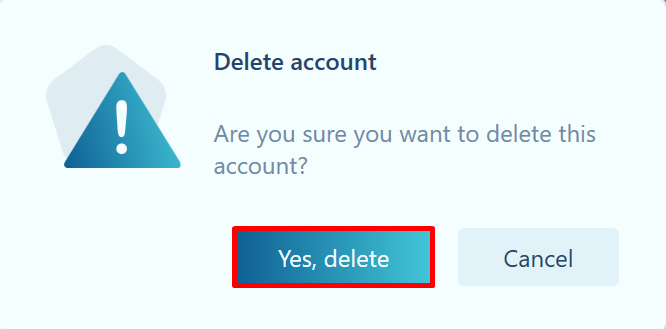


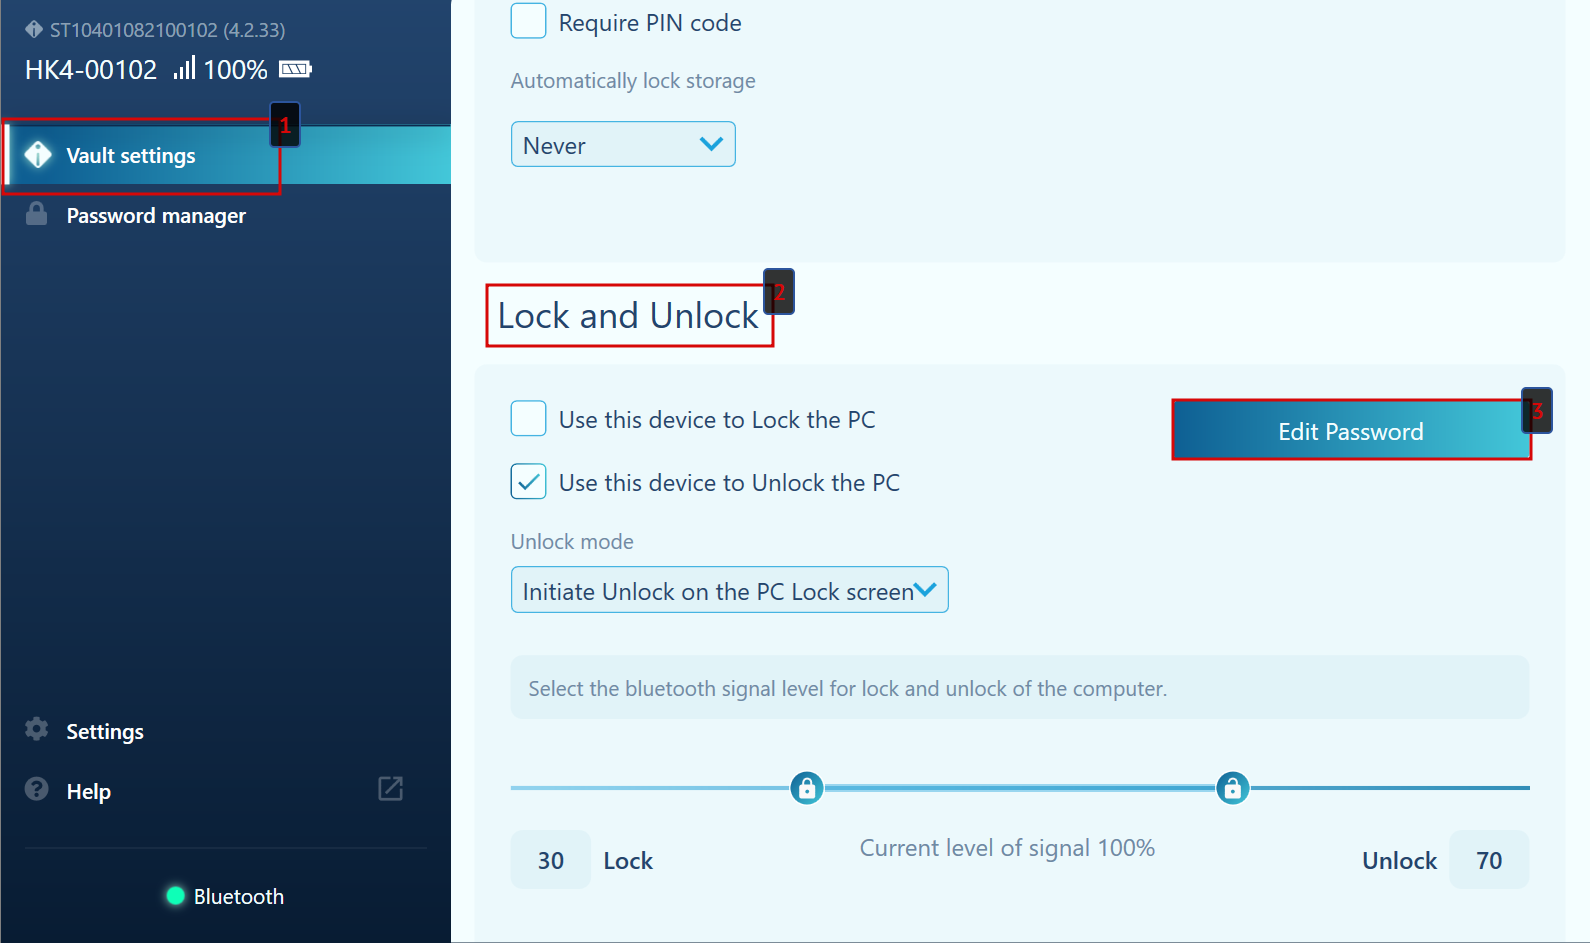

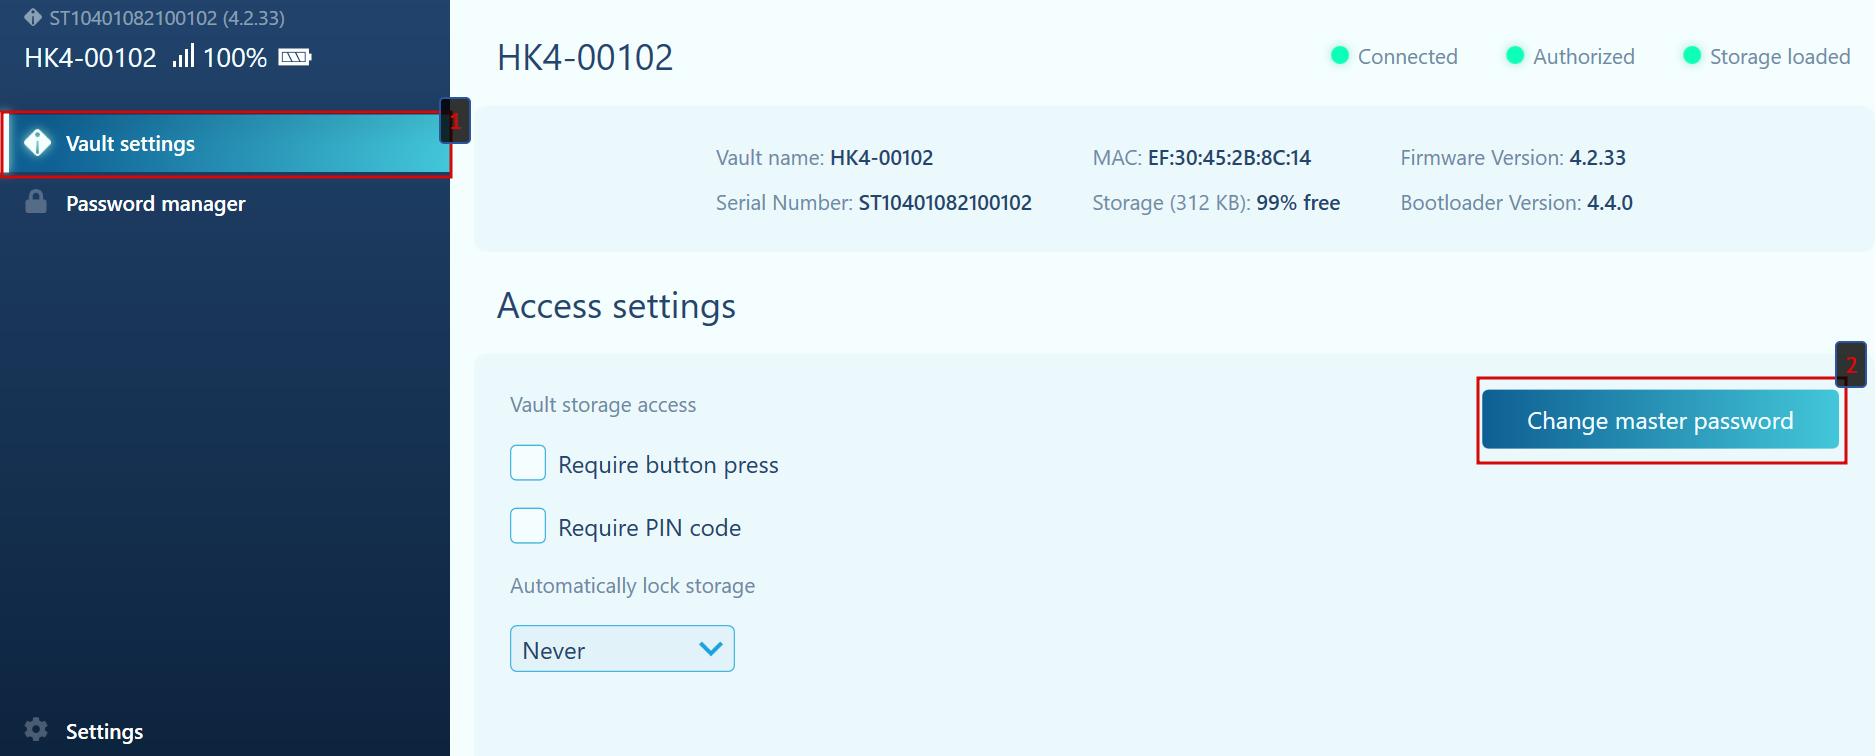
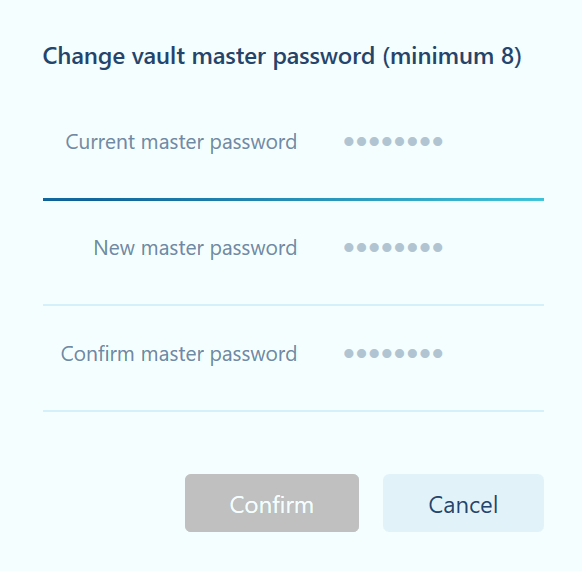
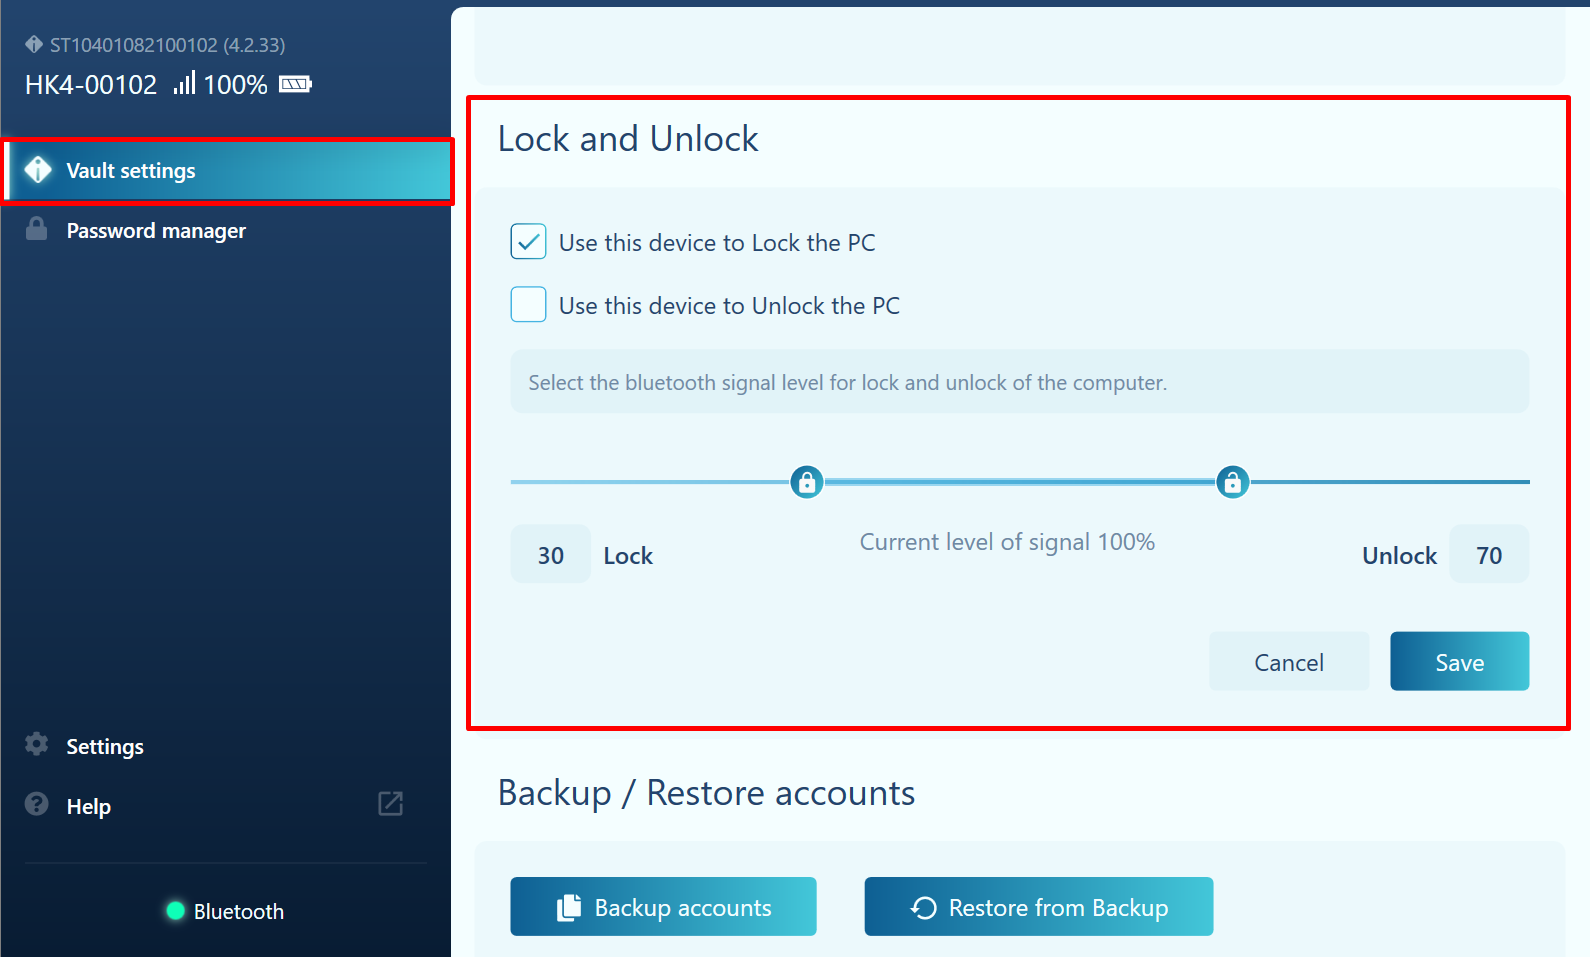
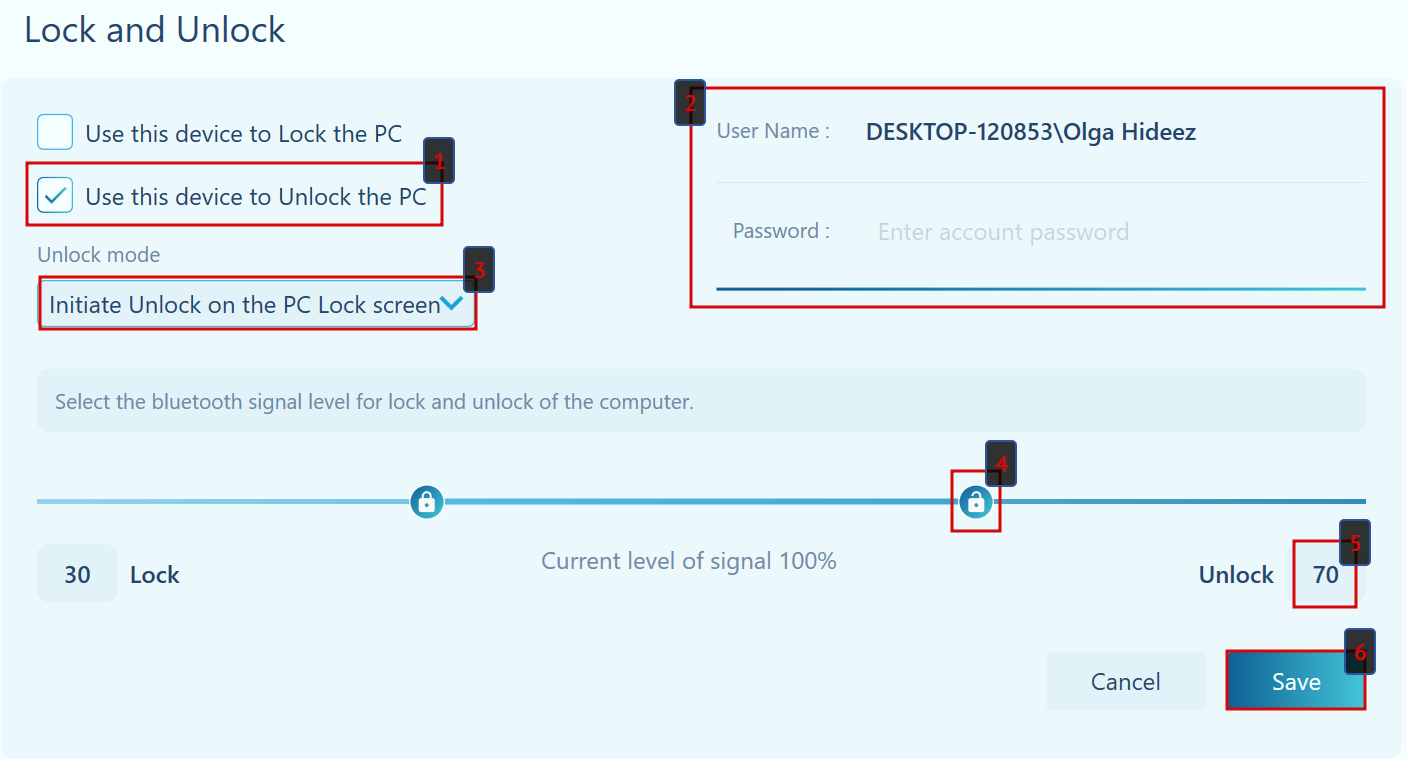
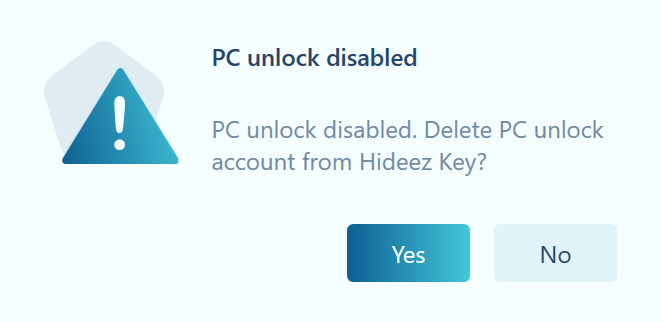
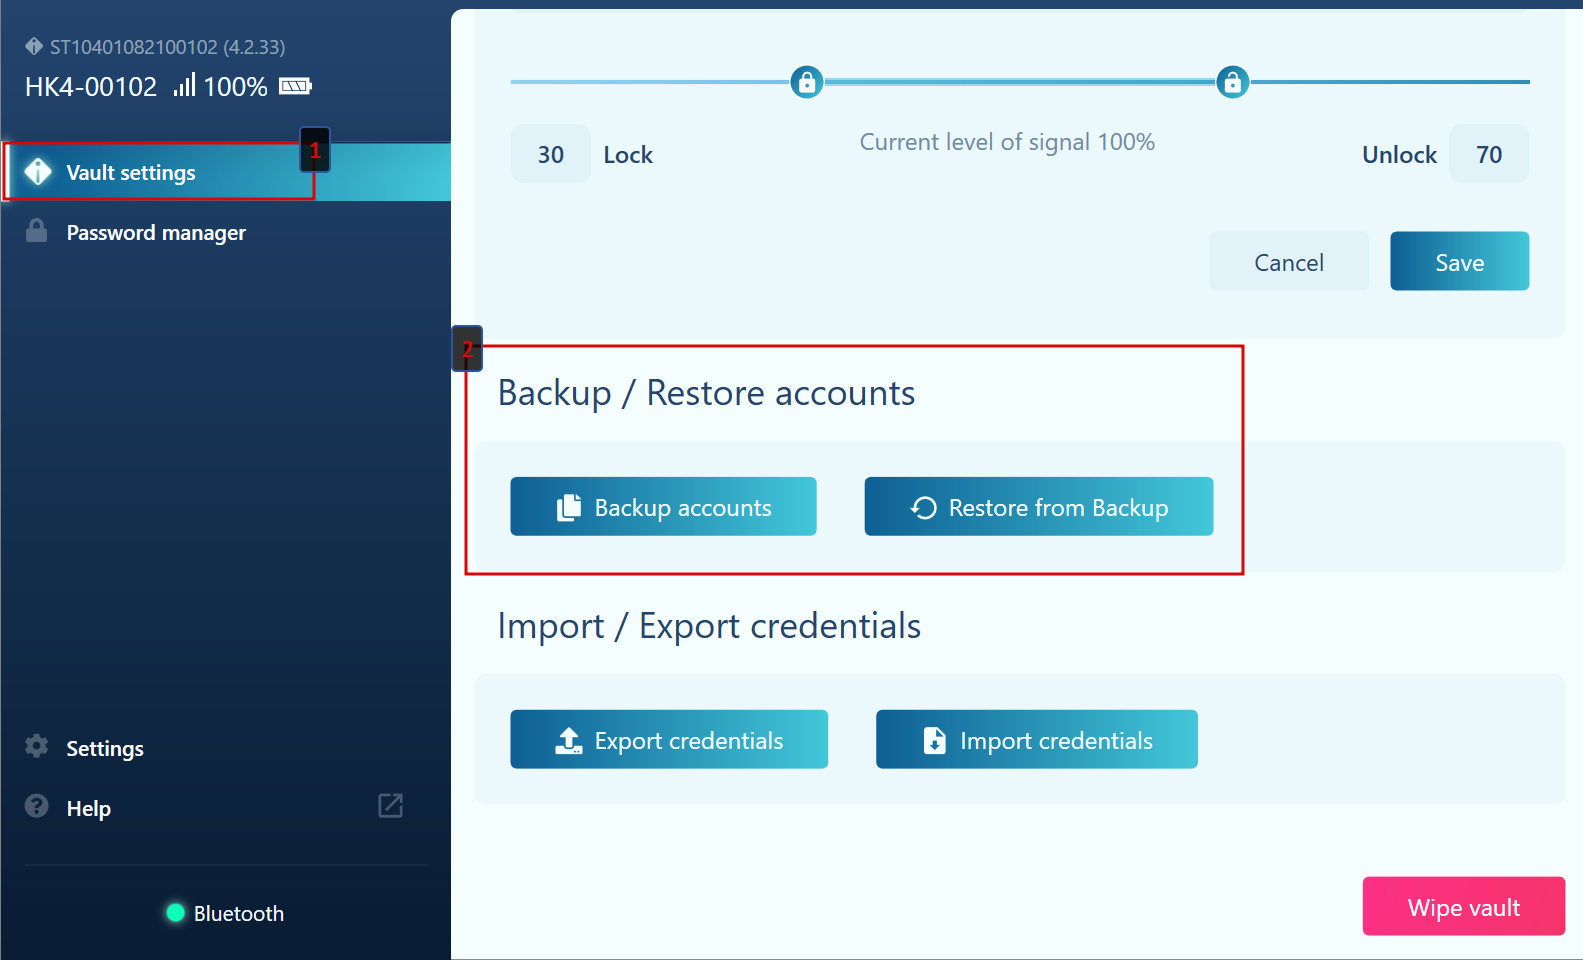
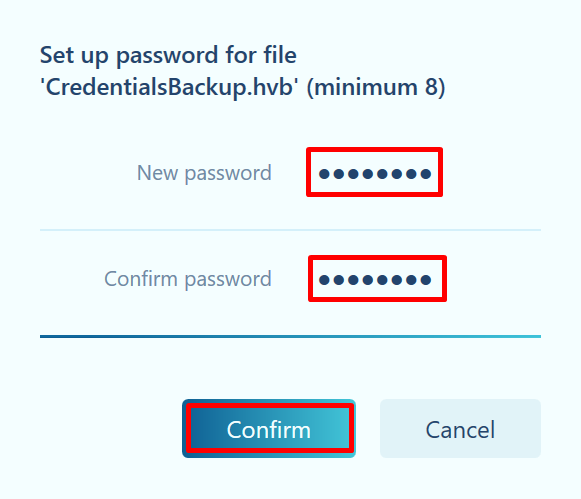
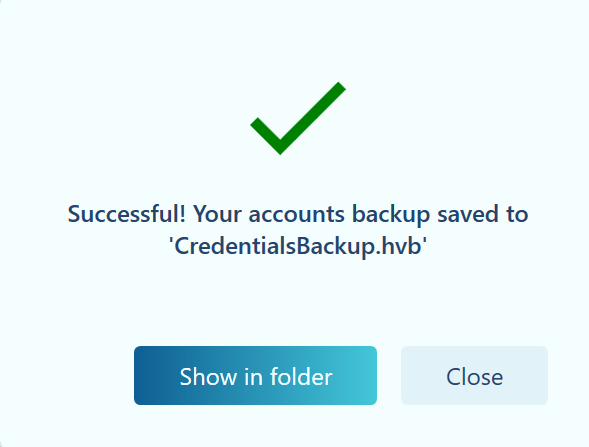
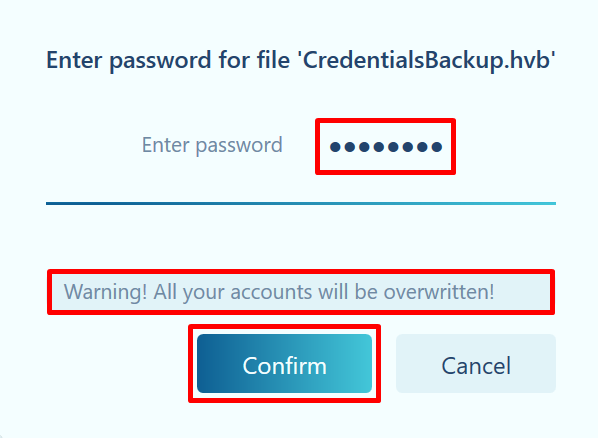
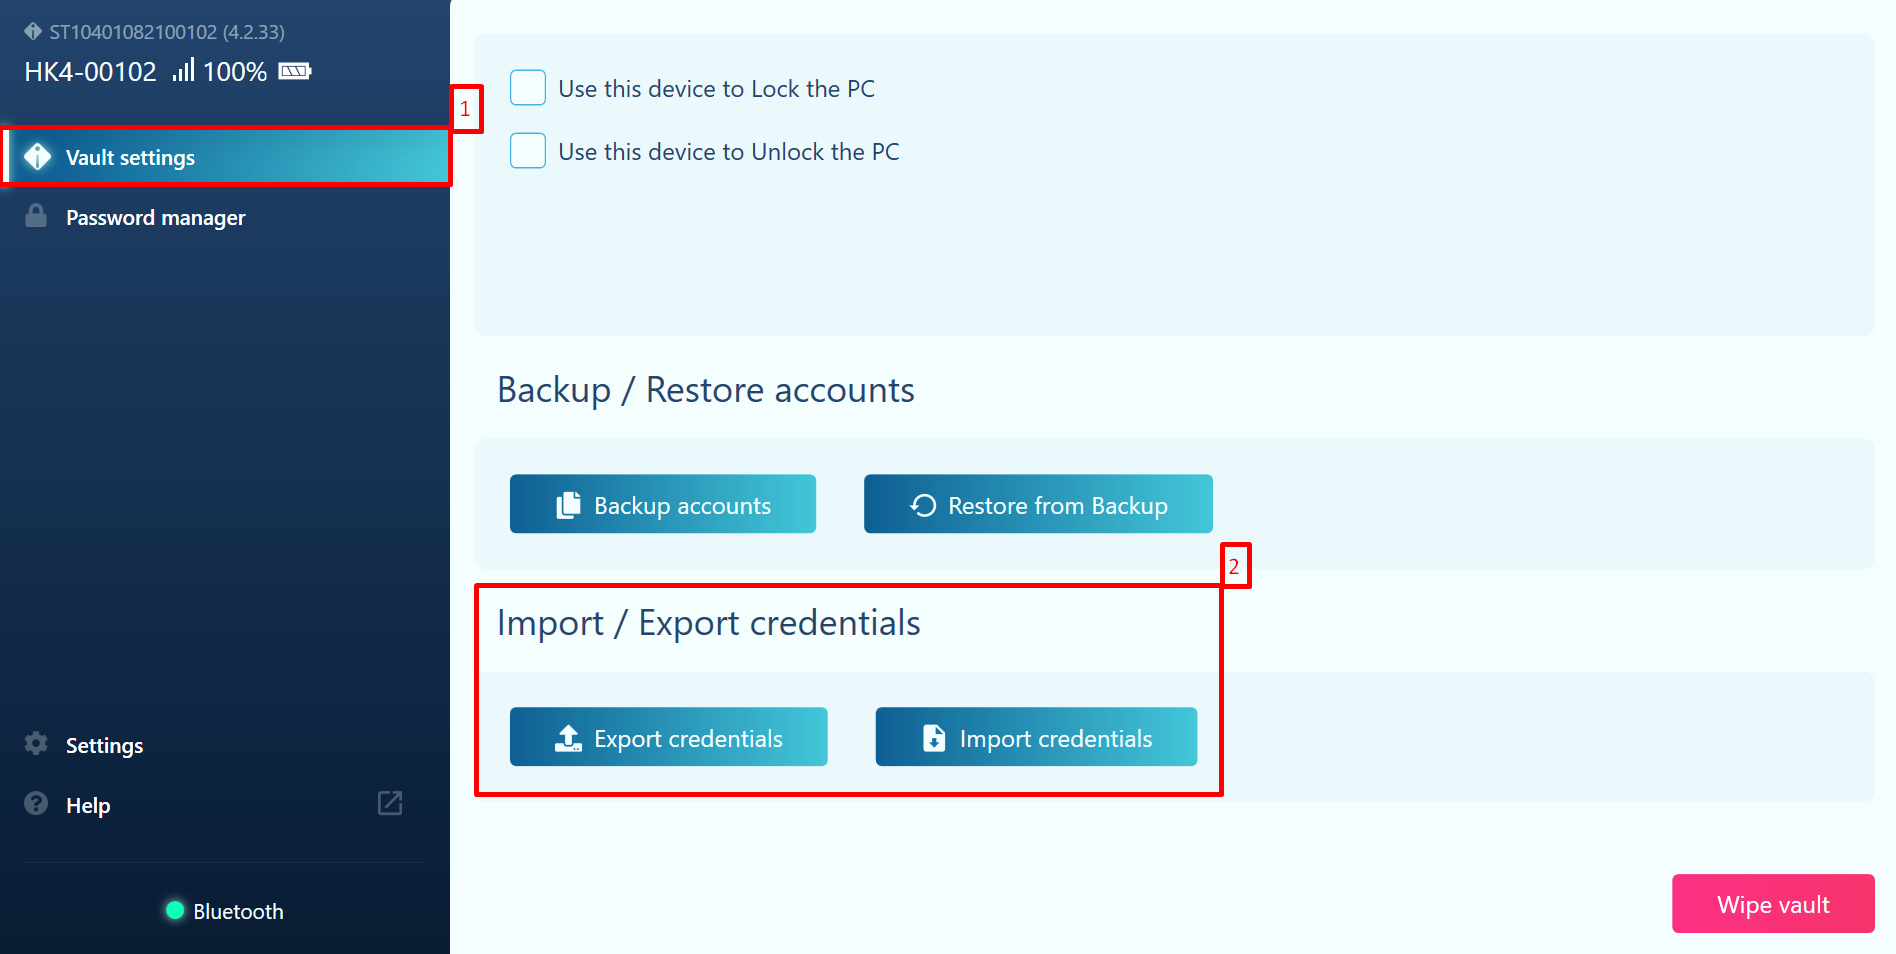

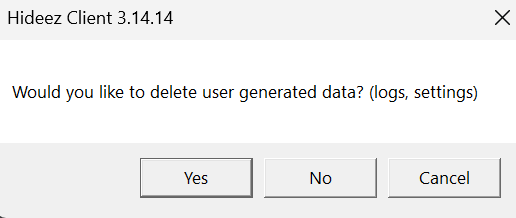


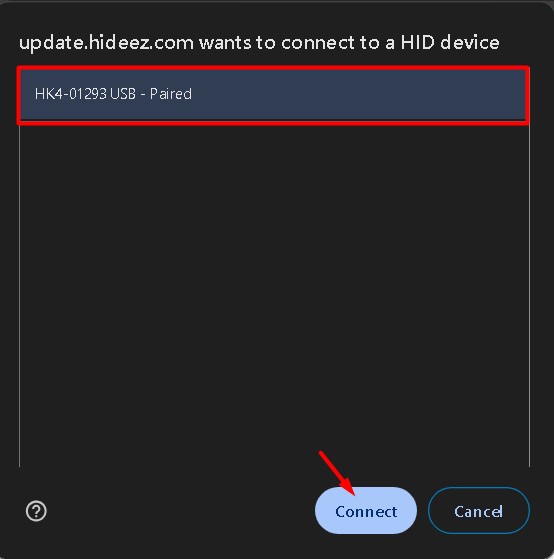
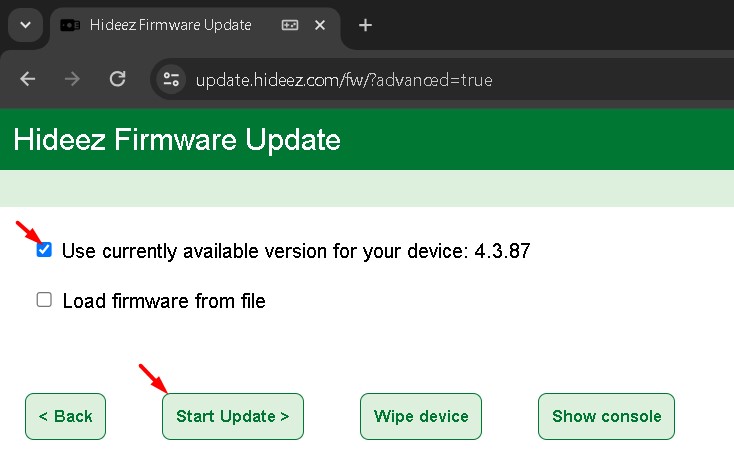
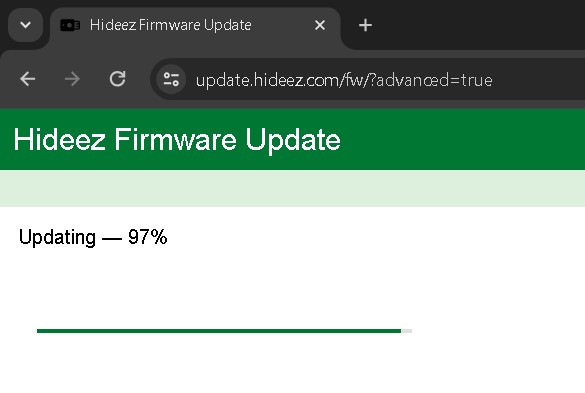
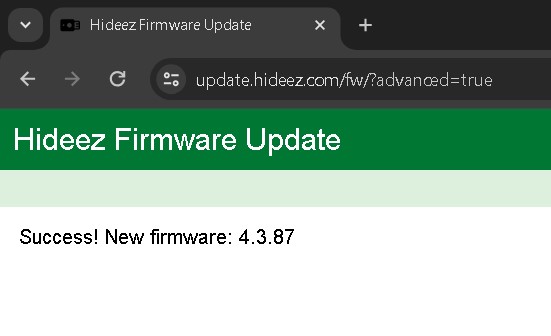

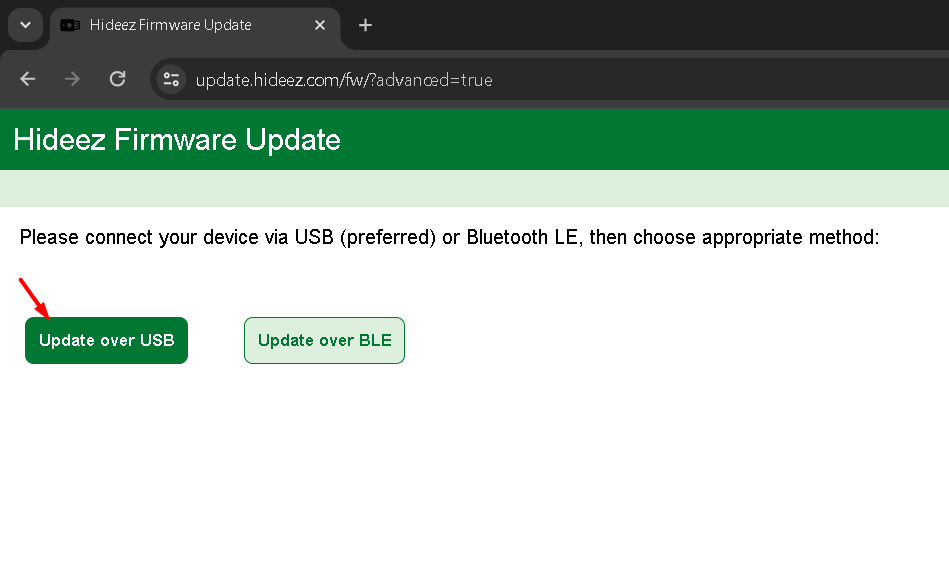
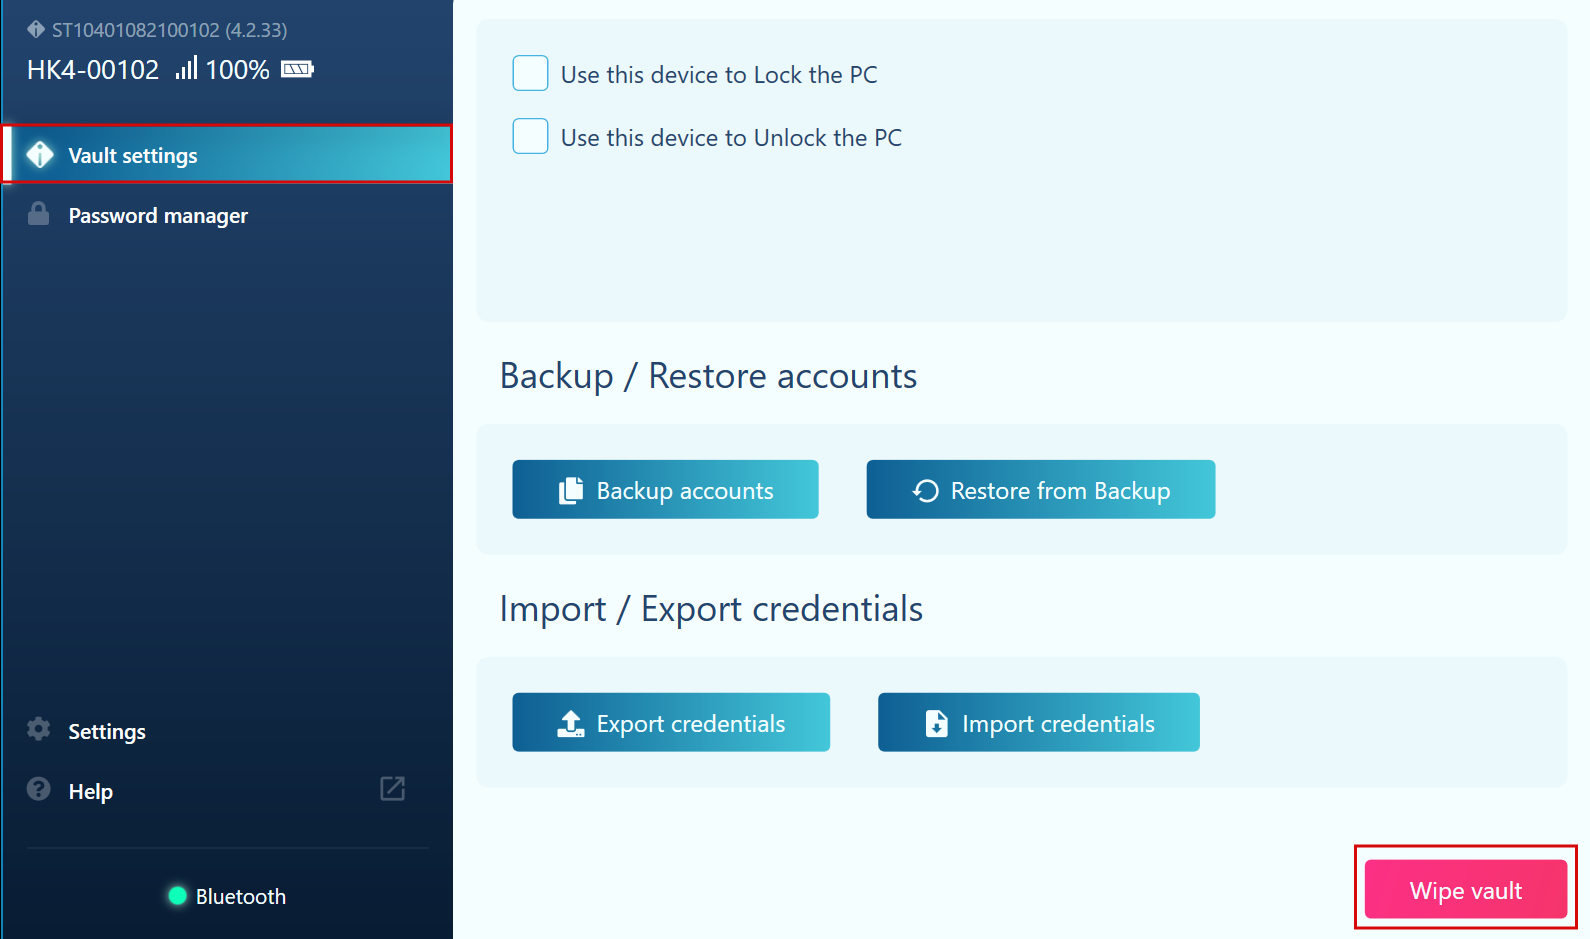
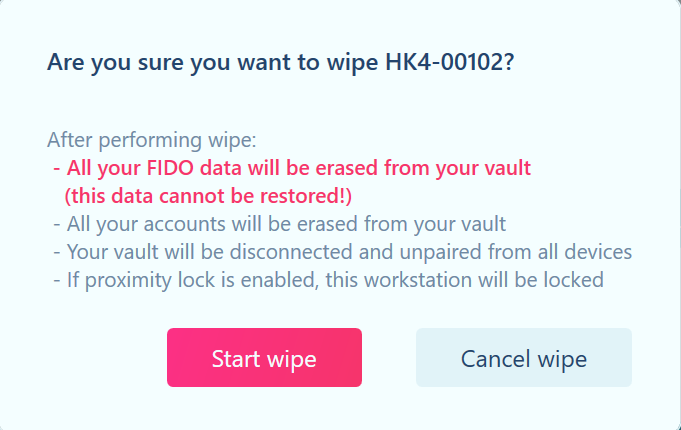
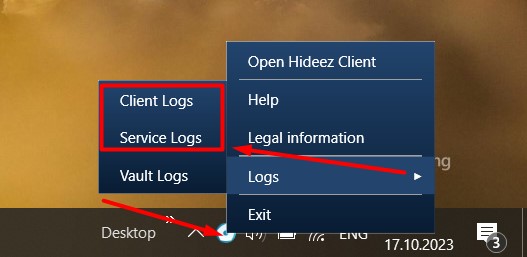
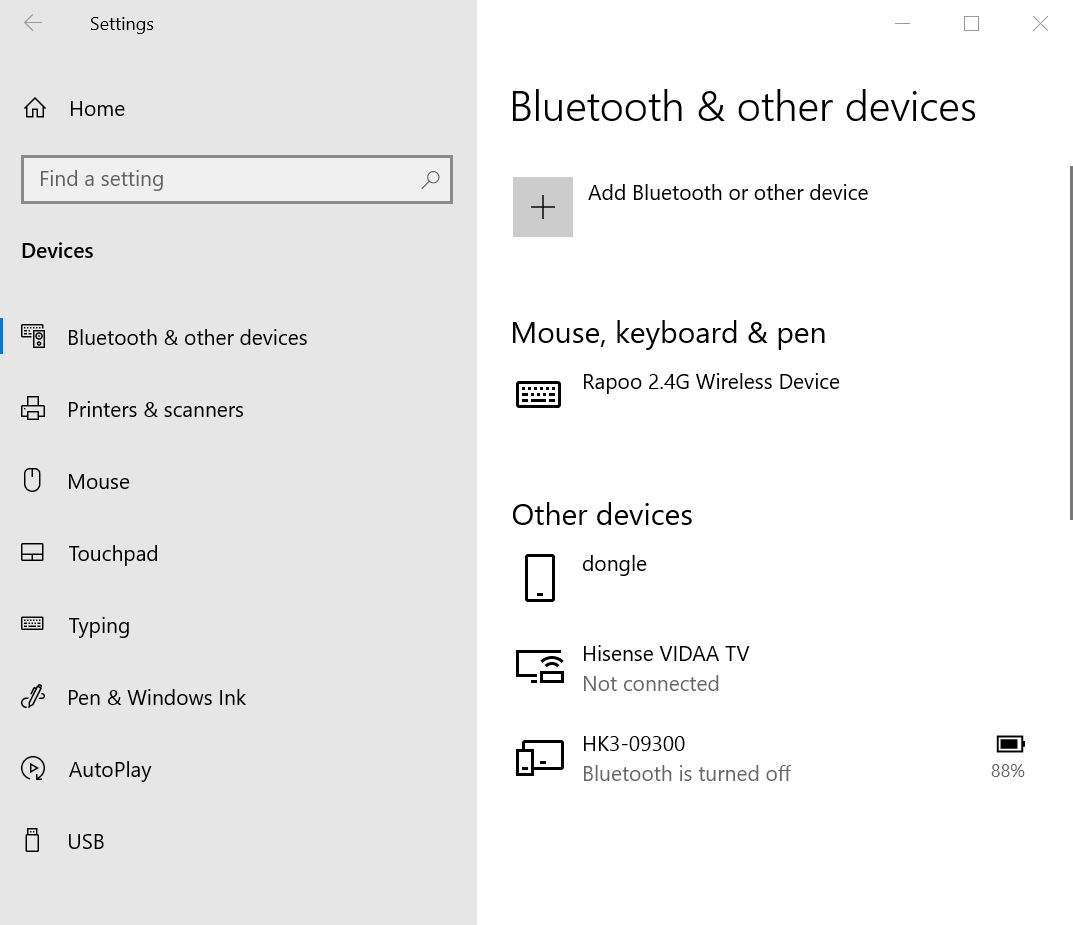
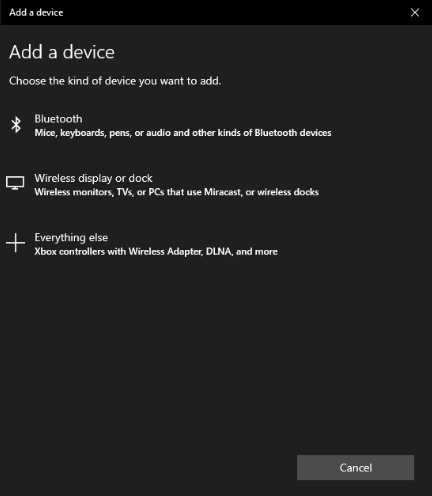
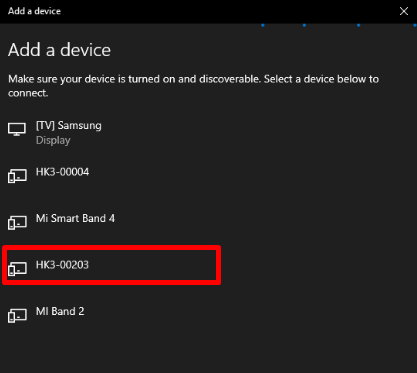
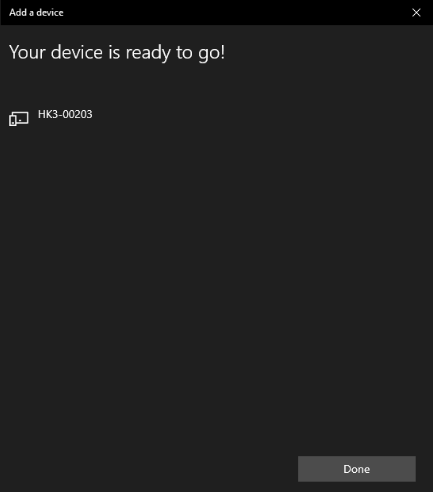
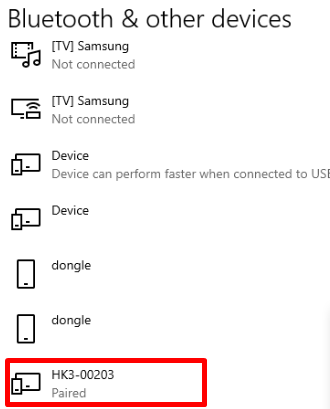
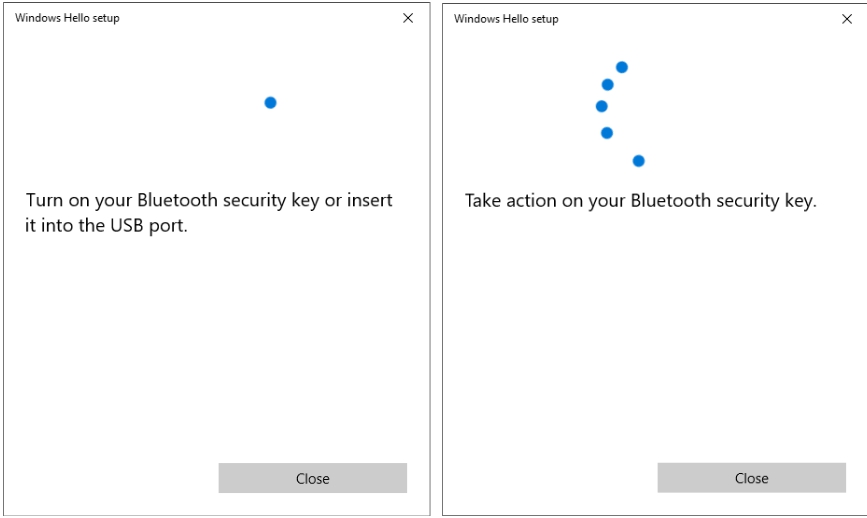
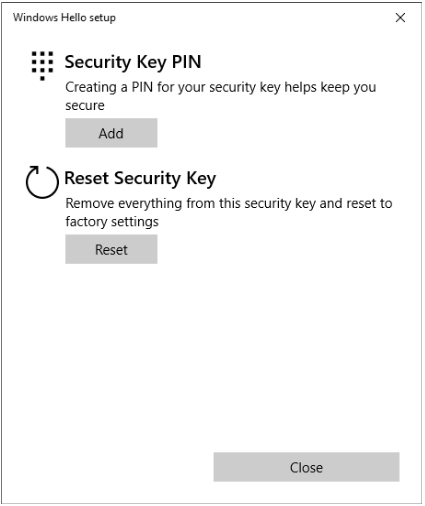
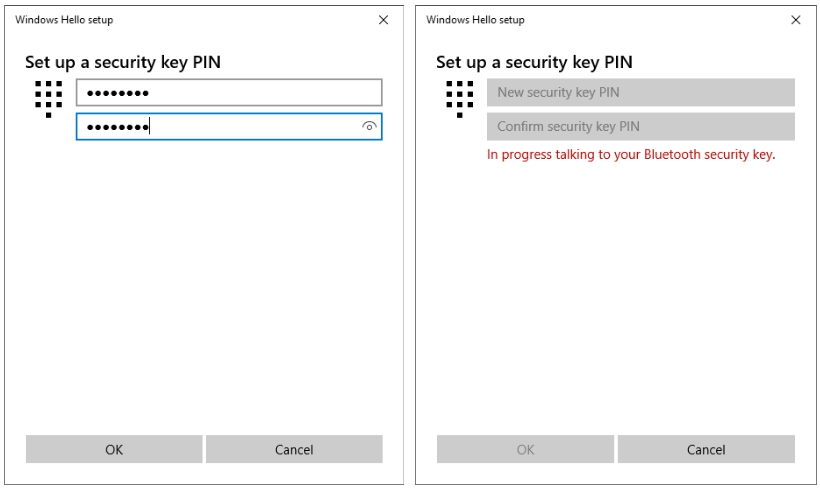
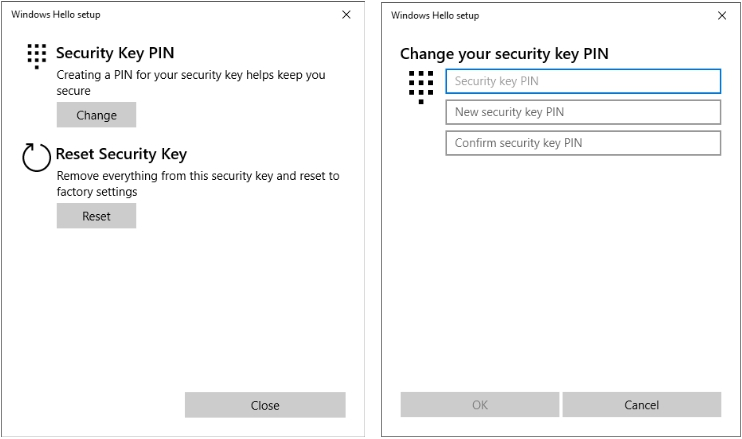
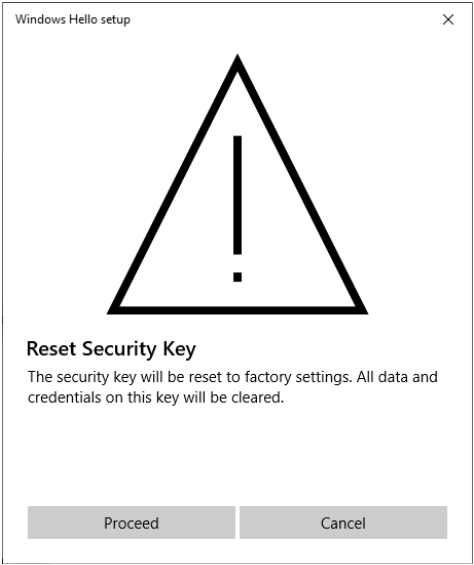
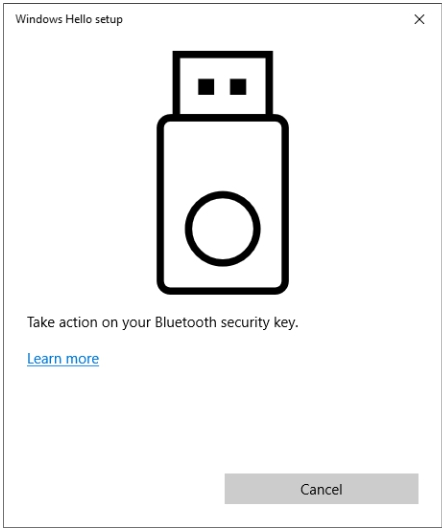
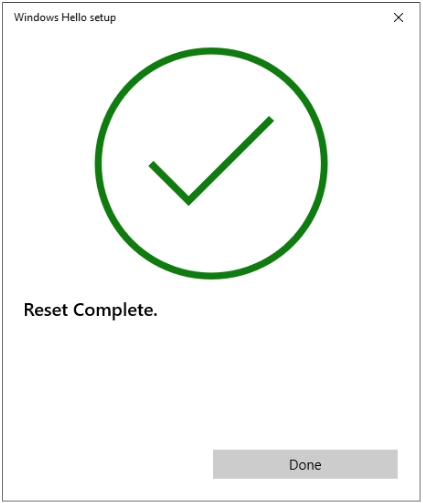


.png?alt=media&token=c7d83910-3114-41ce-9ce9-5d5363c87d20)
.png?alt=media&token=ea1fa4e4-807b-442e-880a-efee68037b2a)
.png?alt=media&token=4259f79b-0260-4961-bdb8-8dbb02e70f87)

.avif?alt=media&token=4233670e-acc6-4e62-a08c-2376b711476c)
.png?alt=media&token=e0d75527-f69c-4802-835d-c4df7d94762d)
.png?alt=media&token=1fa9d291-578e-4666-aa9c-ad87323ebcf4)
.png?alt=media&token=5e8d0fb8-8a77-4846-bdd5-15e8299e2385)
.png?alt=media&token=428147a3-dd92-4434-bd46-d7f4c355bffd)


